

Halloween charcuterie board has become my absolute favorite thing to make for parties. I’m not even kidding—I’ve made probably seven of these in the past two years, and every single time, people lose their minds. They take pictures, they post on Instagram, and then they destroy it in like fifteen minutes because it tastes as good as it looks.
I made my first Halloween charcuterie board three years ago for a party at my apartment. I’d seen them on Pinterest and thought “how hard can it be?” Pretty hard, actually. My first attempt looked like a crime scene threw up on a cutting board. The “ghost” cheese looked more like a sad blob, my “spiderweb” was just random lines, and I somehow managed to stain my entire counter orange with food coloring. My roommate walked in, looked at the mess, and said “What happened here?” Not the reaction I was going for.
But now? Now I’ve got this Halloween charcuterie board thing down to a science. Last year I brought one to my friend’s Halloween party and people were literally taking pictures before they’d even tried the food. Someone asked if I was a professional caterer. I was like, no, I just watch way too much Food Network and have anxiety that makes me overprepare for social events.
Why Halloween Charcuterie Boards Are The Best Party Food
Here’s the thing about a Halloween charcuterie board—it’s impressive but actually pretty easy once you know what you’re doing. You’re basically just arranging snacks in a spooky way. But people act like you’ve performed some kind of culinary magic. It’s the best effort-to-compliment ratio of any party food I’ve ever made.
Plus, everyone loves a charcuterie board. Vegetarians can pick around the meat, meat-lovers can load up on salami, picky eaters can just eat crackers and cheese. A Halloween charcuterie board is basically the most inclusive party food that exists. My friend’s eight-year-old and her dad who only eats like five foods both found things they liked on my Halloween charcuterie board. That’s range.
And look, I’m gonna be honest—the first time you make a Halloween charcuterie board, it’s going to take you like two hours. You’ll be standing in your kitchen, strategically placing olives at 11 PM, questioning your life choices. But by the third or fourth time, you can whip one up in like 45 minutes. It’s all about having a system.
I tried making a Halloween charcuterie board with all homemade components once. Made my own crackers, baked my own cheese crisps, the whole thing. It was… fine? But honestly, store-bought stuff tastes just as good and saves you hours. This is not the time to be a cooking hero. Save your energy for arranging everything to look spooky.
What You Need For An Epic Halloween Charcuterie Board
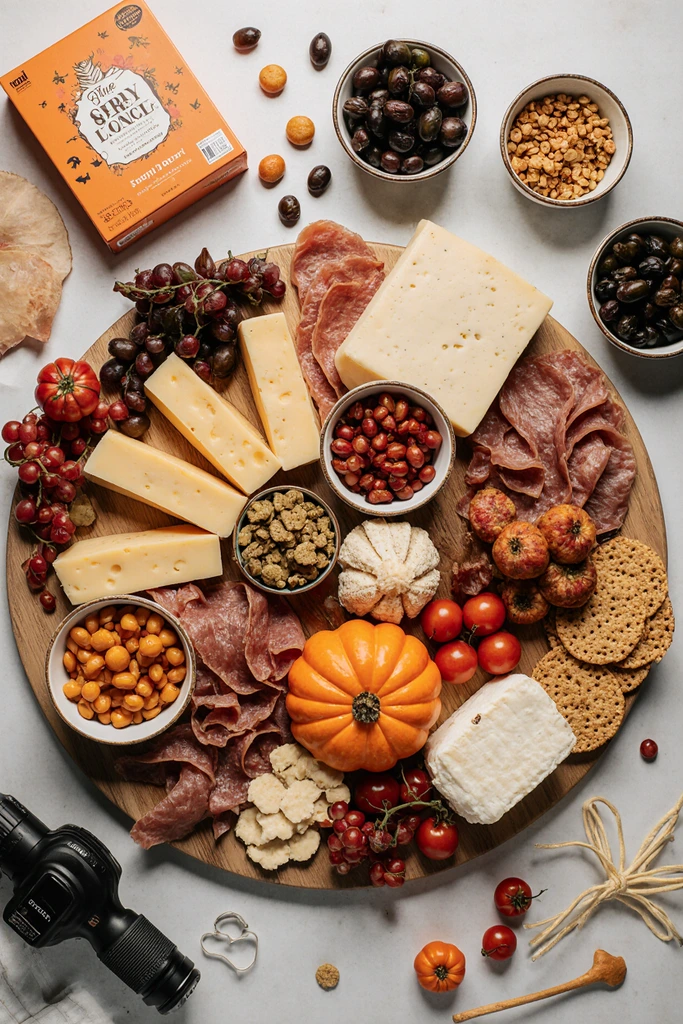
The Board: Get the biggest cutting board, wooden board, or platter you have. I use a huge wooden cutting board that’s like 18×24 inches. You can also use a large baking sheet covered in parchment paper if you don’t have a big board. My sister uses a Halloween-themed serving platter she got at Target. Whatever works for your Halloween charcuterie board.
Cheeses (the foundation of any good Halloween charcuterie board):
- 8 oz white cheddar (for making ghosts)
- 8 oz orange cheddar (because Halloween)
- 6 oz brie or camembert (the fancy one)
- 4 oz goat cheese log (for making things look like eyeballs, trust me)
- String cheese sticks (for witch fingers—more on this later)
Meats:
- 6 oz prosciutto (fancy and easy to fold into roses)
- 6 oz salami (I get the pre-sliced kind because I’m not slicing all that by hand)
- 4 oz pepperoni
- Some summer sausage if you’re feeling extra
Crackers and Bread:
- Fancy crackers (get a variety, different shapes and flavors)
- Breadsticks or pretzel sticks
- Pita chips or bagel chips
- Those Halloween-colored tortilla chips if you can find them
Fruits and Veggies (gotta have some color on your Halloween charcuterie board):
- Green grapes (they look like eyeballs or can be bunched like grapes… obviously)
- Blackberries or black grapes
- Baby carrots
- Cherry tomatoes
- Orange bell pepper strips
- Celery sticks
Spooky Additions:
- Black olives (for making spiders)
- Green olives
- Cream cheese (for piping and making things stick)
- Dark chocolate pieces or candy corn
- Roasted pumpkin seeds
- Nuts (almonds, walnuts, whatever)
- Little pretzel snaps
- Mini pickles
Supplies:
- Cookie cutters (ghost, bat, pumpkin shapes)
- Toothpicks
- A piping bag or ziplock bag for cream cheese
- Black sesame seeds or poppy seeds (for spider eyes)
Quick note about cheese for your Halloween charcuterie board—don’t buy the pre-cut cheese cubes. They dry out fast and don’t look as good. Get blocks and cut them yourself. Takes an extra five minutes and makes a huge difference. I learned this when my pre-cut cheese cubes looked sad and dried out after sitting out for an hour at a party.
Building Your Halloween Charcuterie Board (Real Instructions)
1. Start with your bowls. Don’t just pile everything directly on the board. Put some things in small bowls first. I usually do three or four small bowls with olives, nuts, honey, or jam. Place these on your Halloween charcuterie board first, spacing them out. This gives you “anchor points” to build around. I forgot to do this once and everything just kind of… slid around. It was chaos.
2. Make your ghost cheese shapes. Use a ghost-shaped cookie cutter to cut shapes from your white cheddar. Or just cut them freehand with a knife if you’re confident (I’m not). Use a toothpick dipped in mustard or a black olive piece for eyes. Place these ghosts in a few spots on your Halloween charcuterie board. They’re your statement pieces. Make like 6-8 of them.
3. Create cheese pumpkins. Cut rounds from your orange cheddar. Use a small piece of bell pepper stem or a pepperoncini stem as the pumpkin top. Place a few of these around your Halloween charcuterie board. They’re cute and easy and everyone will think you’re so creative. (Don’t tell them it took you thirty seconds.)
4. Make witch fingers. This is where it gets fun. Take string cheese sticks and use a knife to make “knuckle” indents. Slice an almond and place it at the end as a “fingernail.” Secure with a tiny dab of cream cheese if needed. These are creepy and people LOVE them on a Halloween charcuterie board. My nephew calls them “scary fingers” and insists on eating at least three every time.
5. Fold your prosciutto. Fold each slice into quarters or roll them into little roses. Group them together in a few spots on your Halloween charcuterie board. Prosciutto is expensive so make it look fancy. I watched a YouTube tutorial on folding meat and felt very sophisticated until I realized I was spending fifteen minutes arranging cold cuts.
6. Arrange salami and pepperoni. Fold slices in half or quarters and fan them out. Or do that thing where you fold them into quarters and stand them up. Either way, cluster them in groups on your Halloween charcuterie board. Don’t scatter them randomly—grouping looks more intentional and impressive.
7. Make olive spiders. This is easier than it sounds for your Halloween charcuterie board. Take a black olive, cut it in half lengthwise. Use the halves as the spider body. Cut tiny strips of another olive or use chive pieces as legs—stick them into the sides with toothpicks if needed. Use black sesame seeds or tiny pieces of cream cheese as eyes. Place these spiders crawling around your Halloween charcuterie board. They’re creepy and adorable.
8. Create a spiderweb. Use cream cheese in a piping bag (or ziplock with the corner cut off). Pipe concentric circles on one section of your Halloween charcuterie board. Then drag a toothpick from the center outward to create the web effect. This looks SO impressive but takes like two minutes. I messed this up the first three times—the trick is not making your cream cheese too thin or it won’t hold the pattern.
9. Add the crackers and bread. Tuck these in the empty spaces around your Halloween charcuterie board. Stand some up, lay some flat, create texture and height. Don’t just pile them in one spot. Scatter them around so people can access them easily. I once put all the crackers in one corner and people had to reach across the entire board. Rookie mistake.
10. Fill in with fruits and veggies. Use cherry tomatoes as little pumpkins. Bunch grapes together. Add carrot sticks like they’re bones. Bell pepper strips add color to your Halloween charcuterie board. Fill in any gaps but don’t overcrowd—you want it to look abundant but not messy.
11. Scatter the extras. Throw in some chocolate pieces, candy corn (controversial, I know), pumpkin seeds, nuts. These little touches fill in gaps on your Halloween charcuterie board and give people different textures to snack on. Plus they add color.
12. Final touches. Step back and look at your Halloween charcuterie board. Does it need more orange? More black? More height in certain areas? Add a few garnishes like fresh herbs (rosemary looks like little trees), or Halloween picks stuck into cheese cubes. Make it look intentionally spooky and abundant.
Tips That’ll Save Your Life (Or At Least Your Party)
Build your Halloween charcuterie board as close to party time as possible. If you make it more than two hours ahead, cheese starts drying out and everything looks sad. I learned this when I made one at noon for a 7 PM party. By party time, the edges of everything were crusty and weird.
Keep your Halloween charcuterie board in the fridge covered with plastic wrap until right before guests arrive. Just be careful pulling the plastic off so you don’t mess up your carefully arranged spiders.
Don’t stress about perfection. My most popular Halloween charcuterie board was the one where I was running late and just kind of threw things on with minimal planning. It looked “artfully messy” which apparently is a thing.
If something doesn’t work, eat the evidence and try again. I’ve definitely eaten several failed ghost cheese shapes and wonky salami folds. Quality control, you know?
Take a picture before anyone touches it. Trust me on this. Your Halloween charcuterie board will look amazing for exactly thirty seconds after you unveil it, then it’s chaos. Document it for Instagram.
Things I’ve Learned The Hard Way About Halloween Charcuterie Boards
Don’t use food coloring on everything. I tried dyeing cream cheese bright orange once and it looked radioactive. And it stained everyone’s mouths. Explaining to guests why they had orange tongues was awkward.
Room temperature cheese tastes better. Take your cheese out of the fridge 30-45 minutes before you start building your Halloween charcuterie board. Cold cheese doesn’t have as much flavor and it’s harder to cut.
You need more cheese and meat than you think. I always double what I think I need for a Halloween charcuterie board because people eat WAY more than you’d expect. First party I did, I ran out in twenty minutes. Embarrassing.
Toothpicks are your friend. Use them to hold things in place, to make it easier to grab items, to create height. I go through like fifty toothpicks on every Halloween charcuterie board I make.
Label things if you’re doing something unusual. I made “mummy jalapeño poppers” once and put them on my Halloween charcuterie board without warning people they were spicy. Several people were not happy. Learn from my mistakes.
Variations On The Halloween Charcuterie Board Theme
Sweet Halloween charcuterie board: All desserts. Cookies, brownies, candy, chocolate. Arranged in Halloween shapes. My niece’s birthday is near Halloween and I did this for her party. The kids went FERAL. Good times.
Breakfast Halloween charcuterie board: Made this for a Halloween brunch once. Bagels, cream cheese, muffins, fruit, yogurt, granola. Still arranged spooky with ghost-shaped bagels and spider donuts. Actually really cute.
Taco-themed Halloween charcuterie board: All the taco fixings arranged spookily. My boyfriend requested this and I thought he was crazy but it actually worked. Chips, salsa, guac, seasoned meat, cheese, veggies, all arranged with Halloween flair.
Kids’ Halloween charcuterie board: More candy, less fancy cheese. String cheese ghosts, pizza roll “eyes,” fruit snacks, popcorn, pretzels. Made this for my nephew’s class party and the teacher said I was “extra.” She meant it as a compliment. I think.
Why I Love Making These

There’s something satisfying about building a Halloween charcuterie board. It’s creative but you don’t need any actual cooking skills. You’re basically doing edible arts and crafts. And the reaction you get when you bring it to a party? Worth every minute of standing in your kitchen placing olive spiders.
My friends now expect me to bring a Halloween charcuterie board to every Halloween event. It’s become my thing. Last year I tried to bring cupcakes instead and everyone was like “where’s the charcuterie board?” So now I’m stuck making them forever. Not complaining.
They’re also a great conversation starter. People gather around the Halloween charcuterie board and talk about how cute everything looks while eating. It creates this natural social hub at parties. I’m awkward at parties, so having something for people to focus on besides me is clutch.
Real Talk Before You Start
Your first Halloween charcuterie board will not look like the ones on Pinterest. Mine looked like a toddler arranged it. But it still tasted good and people still appreciated it. Don’t let perfect be the enemy of done.
This will be more expensive than you expect. A good Halloween charcuterie board costs like $60-80 in ingredients. But it feeds a lot of people and looks impressive, so it’s worth it for a special party.
You will spend longer than you expect arranging everything. Factor in at least an hour, probably more if it’s your first time building a Halloween charcuterie board. Put on a podcast, pour yourself a drink, and embrace the process.
Not everything needs to be Halloween-themed. Sometimes just having orange and black elements on your Halloween charcuterie board is enough. Don’t stress about making every single component spooky.
Let me know if you make one! Seriously, I want to see pictures of your Halloween charcuterie boards. What creative elements did you add? Did you try the olive spiders? Drop a comment because I love seeing other people’s versions.
Happy haunting! (And may your cheese cutting be straight and your spiderwebs perfectly piped.) 🎃👻
Check more Halloween recipes : 17 Halloween Appetizers for Party
Table of Contents
Halloween Charcuterie Board
An impressive Halloween charcuterie board featuring ghost-shaped cheese, olive spiders, witch fingers, and creative spooky arrangements. Perfect for Halloween parties with minimal cooking required. Feeds 12-15 people and looks Instagram-worthy.
Ingredients
- 8 oz white cheddar cheese
- 8 oz orange cheddar cheese
- 6 oz brie or camembert
- 4 oz goat cheese log
- 4-6 string cheese sticks
- 6 oz prosciutto
- 6 oz salami, sliced
- 4 oz pepperoni
- 4 oz summer sausage
- Assorted crackers (12 oz)
- Breadsticks or pretzel sticks
- Pita chips or bagel chips
- Green grapes (1 cup)
- Blackberries (1 cup)
- Baby carrots (1 cup)
- Cherry tomatoes (1 cup)
- Orange bell pepper, sliced
- Celery sticks (1 cup)
- Black olives (1 cup)
- Green olives (1/2 cup)
- Cream cheese (4 oz)
- Dark chocolate pieces or candy corn (1 cup)
- Roasted pumpkin seeds (1/2 cup)
- Mixed nuts (1/2 cup)
- Sliced almonds (for witch fingernails)
- Black sesame seeds
- Fresh herbs for garnish
Instructions
-
Step 1Remove cheese from refrigerator 30-45 minutes before assembling to bring to room temperature.
-
Step 2Place 3-4 small bowls on your large board or platter, spacing them evenly. Fill with olives, nuts, and other small items.
-
Step 3Use ghost-shaped cookie cutter to cut shapes from white cheddar. Add olive pieces or mustard dots for eyes. Place around board.
-
Step 4Cut rounds from orange cheddar and top with small pepper stem pieces to create cheese pumpkins.
-
Step 5Create witch fingers by cutting indents in string cheese sticks for knuckles and attaching sliced almonds as fingernails with cream cheese.
-
Step 6Fold prosciutto slices into quarters or roll into roses. Group together in clusters on board.
-
Step 7Fold salami and pepperoni slices and fan out in groups around the board.
-
Step 8Make olive spiders by cutting black olives in half lengthwise and adding thin olive strip legs. Use sesame seeds for eyes.
-
Step 9Pipe cream cheese in concentric circles on one section of board, then drag toothpick from center outward to create spiderweb pattern.
-
Step 10Tuck crackers and breadsticks into empty spaces around board, creating height and texture variation.
-
Step 11Fill remaining gaps with fruits and vegetables: bunch grapes, scatter cherry tomatoes, add carrot and celery sticks.
-
Step 12Scatter chocolate pieces, candy corn, pumpkin seeds, and nuts throughout board to fill small gaps and add color.
-
Step 13Add final touches with fresh herbs, Halloween picks, or garnishes. Keep refrigerated covered with plastic wrap until serving.