

Halloween crinkle cookies have become my October obsession, and honestly, it took me way too many attempts to get these right. Like, embarrassingly many. But now that I’ve figured out the secret to getting those perfect cracks without the dough spreading into sad, flat pancakes, I’m sharing everything because nobody should suffer through what I call “The Great Cookie Disaster of 2022.”
Look, I’m gonna be honest with you—I started making these Halloween crinkle cookies because my neighbor’s kids kept asking why all my cookies were “boring brown” during Halloween. Ouch. Kids really don’t hold back, do they? So I decided to embrace the chaos and make cookies that actually looked like Halloween threw up on them. In the best way possible.
The Backstory (AKA My Cookie Fails)
Now, here’s the thing about Halloween crinkle cookies that nobody tells you upfront. The first time I made them, I just took my regular chocolate crinkle cookie recipe and threw in some orange food coloring. Disaster. Complete disaster. They came out looking like sad pumpkin-colored hockey pucks, and the cracks were more like tiny surface scratches. My 8-year-old took one bite and said, “Mom, these taste like sadness.” Brutal but accurate.
The second attempt? I went overboard with the food coloring because I wanted that vibrant Halloween crinkle cookies orange, and they ended up staining everyone’s teeth and hands. My husband looked like he’d been in a Cheetos fight. Plus, all that extra liquid from the coloring made them spread too much. Learning experience, let’s call it.
But version three—oh, version three was when everything clicked. I figured out that gel food coloring is your best friend for Halloween crinkle cookies, and you need to adjust the flour slightly to account for any extra moisture. Also, and this might sound weird, adding a tiny bit of cocoa powder actually makes the orange pop more. Don’t ask me why, it just works.
What Makes These Halloween Crinkle Cookies Special
These aren’t just regular cookies with orange food coloring slapped in (learned that lesson the hard way). The key to perfect Halloween crinkle cookies is getting that rich, slightly chewy center with those dramatic cracks that show off the powdered sugar underneath. I use a combination of both white and orange dough to create this cool marbled effect that makes each Halloween crinkle cookie unique.
Actually, you know what? My mom always said the best cookies come from happy accidents, and she was right. One time I accidentally added the vanilla twice to my Halloween crinkle cookies batter, and they came out with this amazing depth of flavor that everyone raved about. Now I always do a double vanilla shot on purpose.
The texture is what gets people though. They’re soft and fudgy on the inside—almost brownie-like—but with that slightly crispy exterior that gives way when you bite it. And those cracks! When done right, your Halloween crinkle cookies will have these gorgeous deep fissures that show off the snowy powdered sugar against that vibrant orange. It’s like Halloween magic in cookie form.
Ingredients (And My Shopping Horror Stories)
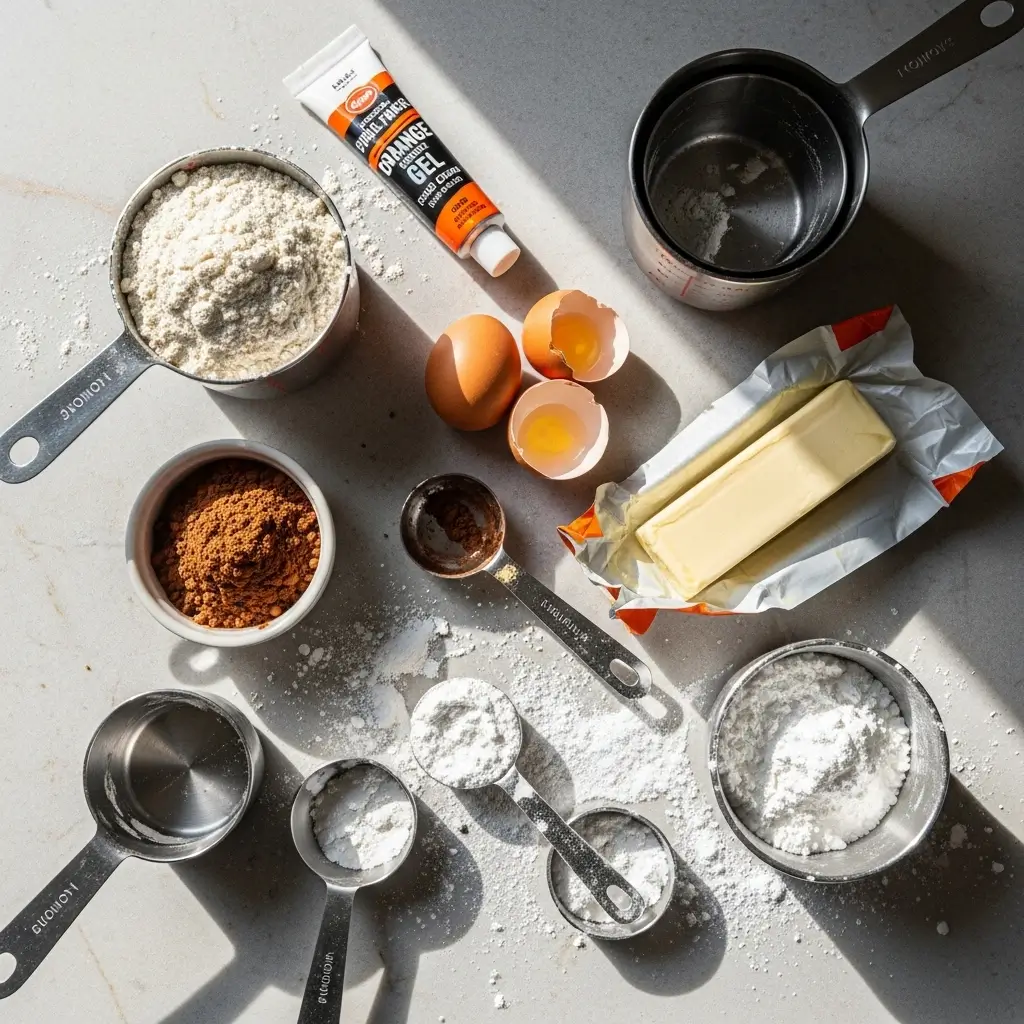
For the Orange Halloween Crinkle Cookies:
- 2 cups all-purpose flour (don’t buy the fancy stuff, regular works fine)
- 1/2 cup unsweetened cocoa powder (this is the secret ingredient I mentioned)
- 2 teaspoons baking powder
- 1/2 teaspoon salt
- 1/2 cup unsalted butter, softened (learned the hard way that salted butter makes them too salty)
- 1 1/2 cups granulated sugar
- 2 large eggs
- 2 teaspoons vanilla extract (remember, I use double)
- 1/4 cup milk
- Orange gel food coloring (seriously, gel not liquid—trust me on this one)
For Rolling:
- 1/2 cup powdered sugar (you’ll probably need more, I always run out)
- Extra orange gel coloring for deeper color (optional)
Shopping tip: Good luck finding decent gel food coloring in October. Everyone’s buying it for Halloween crinkle cookies apparently. I’ve started stocking up in September like some kind of baking prepper. Also, don’t buy pre-measured cocoa powder packets. Just don’t. Get the regular container and measure yourself—it’s way cheaper and you’ll use it for other stuff.
Oh, and here’s something nobody tells you about making Halloween crinkle cookies—the gel food coloring will stain everything. Your hands, your counter, your favorite mixing bowl. I now have a designated “orange bowl” that’s permanently tinted. Consider it a battle scar of successful Halloween crinkle cookies.
The Method (With All My Mistakes Included)
Step 1: Preheat your oven to 350°F. I always forget this step and then stand there like an idiot waiting for the oven to heat up while my Halloween crinkle cookies dough gets warm and weird.
Step 2: Mix your dry ingredients—flour, cocoa powder, baking powder, and salt—in a medium bowl. Whisk them together really well because nobody wants pockets of cocoa powder in their Halloween crinkle cookies. Been there, done that, got the complaints.
Step 3: In your large bowl (preferably the one you don’t mind turning orange), cream the butter and sugar until it’s fluffy. This takes longer than you think—like 3-4 minutes with an electric mixer. Your arm will thank you for not doing this by hand.
Step 4: Add eggs one at a time, then vanilla. Here’s where you add your gel food coloring for Halloween crinkle cookies. Start with just a little—you can always add more, but you can’t take it back. Mix until everything is combined and gorgeously orange.
Step 5: Add your dry ingredients to the wet ingredients, alternating with the milk. Start and end with the dry ingredients. This isn’t just fancy baking talk—it actually makes a difference in the texture of your Halloween crinkle cookies.
Actually, wait. I almost forgot the most important part. Once your dough is mixed, you need to chill it. Like, really chill it. At least 2 hours, but overnight is better. I know, I know—nobody wants to wait when they’re excited about their Halloween crinkle cookies, but trust me. Warm dough = flat cookies. Cold dough = those beautiful cracks we’re after.
Step 6: When you’re ready to bake, scoop the dough into balls about the size of a walnut. Roll them in powdered sugar—and I mean REALLY roll them. Coat those babies like they owe you money.
Step 7: Place on lined baking sheets about 2 inches apart. These Halloween crinkle cookies will spread, so give them room to breathe.
Step 8: Bake for 10-12 minutes. They’ll look underdone when you take them out—that’s normal! They continue cooking on the hot pan. If you overbake Halloween crinkle cookies, they lose that perfect chewy texture.

The Things I Wish Someone Had Told Me
Temperature matters SO much more than I realized when I first started making Halloween crinkle cookies. If your kitchen is hot (like mine in October because our heating is wonky), your dough will be too soft even after chilling. Sometimes I stick the bowl in the freezer for 20 minutes just to firm things up.
Also, the powdered sugar coating isn’t just for looks with Halloween crinkle cookies. It actually helps create those dramatic cracks by providing resistance as the cookies spread. Science! Or magic. Either way, don’t skip it.
Here’s another thing—gel food coloring brands are NOT created equal for Halloween crinkle cookies. I’ve tried them all, and Americolor is worth the extra couple bucks. The cheap stuff either doesn’t give you vibrant color or tastes weird.
And speaking of color, if you want to get really fancy with your Halloween crinkle cookies, you can make half orange and half purple, or even add some black cocoa powder to make spooky dark ones. My nephew went absolutely nuts for the purple ones last year.
When Things Go Wrong (Because They Will)
If your Halloween crinkle cookies spread too much and don’t crack properly, your dough was too warm. Next time, chill longer or add a tablespoon more flour.
If they crack too much and look dry, you either overbaked them or used too much cocoa powder. Yes, there’s a sweet spot with Halloween crinkle cookies, and finding it takes practice.
If the orange color fades during baking (happened to me once), you either used liquid food coloring instead of gel, or your oven runs hot. Get an oven thermometer—seriously, best $10 I ever spent for consistent Halloween crinkle cookies.
The Final Verdict
Look, these Halloween crinkle cookies aren’t going to win any professional baking contests, but they’ll make your house smell amazing and your kids (or let’s be honest, you) very happy. They’re festive, they’re fun, and once you nail the technique, you can make them with your eyes closed.
I’ve been perfecting these Halloween crinkle cookies for three years now, and I finally feel confident sharing the recipe. They’re not fancy, but they’re good and that’s what matters. Plus, they freeze really well if you want to make them ahead for Halloween parties.
Seriously, try these Halloween crinkle cookies and let me know how yours turn out! I’m always curious to hear if anyone else discovered any happy accidents along the way.
Happy baking! (And may your powdered sugar coating actually stick this time) 🎃
Check also The Best Pumpkin Snickerdoodle Cookies (That Actually Taste Like Fall)
Table of Contents
Halloween Crinkle Cookies
Perfect Halloween crinkle cookies with vibrant orange color and dramatic white cracks. Soft, chewy texture with a slightly crispy exterior. These festive cookies use gel food coloring and a secret cocoa powder trick for the best results.
Ingredients
- 2 cups all-purpose flour
- 1/2 cup unsweetened cocoa powder
- 2 teaspoons baking powder
- 1/2 teaspoon salt
- 1/2 cup unsalted butter, softened
- 1 1/2 cups granulated sugar
- 2 large eggs
- 2 teaspoons vanilla extract
- 1/4 cup milk
- Orange gel food coloring
- 1/2 cup powdered sugar for rolling
Instructions
-
Step 1Preheat oven to 350°F (175°C). Line baking sheets with parchment paper.
-
Step 2Whisk together flour, cocoa powder, baking powder, and salt in a medium bowl.
-
Step 3In a large bowl, cream butter and sugar until fluffy, about 3-4 minutes.
-
Step 4Add eggs one at a time, then vanilla and orange gel food coloring. Mix until combined.
-
Step 5Add dry ingredients alternating with milk, starting and ending with dry ingredients.
-
Step 6Chill dough for at least 2 hours or overnight.
-
Step 7Scoop dough into walnut-sized balls and roll generously in powdered sugar.
-
Step 8Place on prepared baking sheets 2 inches apart.
-
Step 9Bake for 10-12 minutes until edges are set but centers look slightly underdone.
-
Step 10Cool on baking sheet for 5 minutes before transferring to wire rack.