

Halloween mummy bananas are honestly the easiest Halloween treat I’ve ever made, and I’ve tried a lot of Pinterest fails over the years. Look, I’m not the crafty mom who makes elaborate Halloween costumes from scratch or carves perfect jack-o’-lanterns. But these mummy bananas? Even I can handle them, and they actually look like what they’re supposed to look like.
I discovered mummy bananas when I was desperately trying to find a healthy Halloween snack for my kid’s classroom party. Everything else required food coloring, tons of sugar, or ingredients that cost more than my weekly coffee budget. But these mummy bananas use stuff you probably already have—bananas, chocolate chips, and white chocolate or yogurt—and kids think they’re absolutely hilarious.
Now, here’s what I love about Halloween mummy bananas: they’re basically just bananas with decorations, so even the pickiest eaters will try them. My neighbor’s kid won’t eat anything that looks “different,” but she demolished three of these Halloween mummy bananas at our party last year. Sometimes the simplest ideas are actually the best ones.
Why Halloween Mummy Bananas Work So Well
The thing about mummy bananas is that bananas are already the perfect shape for mummies—they’re oval, they’re the right size for individual treats, and they have that natural curve that makes them look more interesting than just a straight candy bar or cookie. Plus, they’re actually healthy underneath all the mummy decorations.
I’ve made mummy bananas probably twenty different ways over the past few years, experimenting with different “bandage” materials and eye options. The key is keeping it simple enough that you don’t hate your life halfway through making them, but detailed enough that they actually look like mummies instead of just bananas with random white stuff on them.
The best part about mummy bananas is that kids can help make them. My 7-year-old is obsessed with these every Halloween season, and even my teenager will grudgingly admit they’re “kind of cute” while sneaking one when she thinks I’m not looking.
What Goes Into Perfect Halloween Mummy Bananas
The Base:
- 4-6 ripe bananas (not too soft, or they’ll be mushy to work with)
- Popsicle sticks (optional, but makes them easier to handle)
For the Mummy Wrappings:
- 1 cup white chocolate chips OR
- 1/2 cup plain Greek yogurt mixed with 1 tablespoon honey
- 1 tablespoon coconut oil (if using white chocolate)
For the Eyes:
- Mini chocolate chips (the tiny ones work best)
- Regular chocolate chips (if you can’t find mini ones)
- Raisins (cut in half – sounds weird but works great)
Optional Upgrades:
- Shredded coconut for extra “bandage” texture
- A tiny bit of vanilla extract in the yogurt version
- Pretzel sticks for arms (if you want to get really elaborate)
About the banana choice for your Halloween mummy bananas—you want them ripe enough to taste good, but not so ripe that they’re mushy and fall apart when you’re decorating them. That sweet spot where they’re yellow with maybe a few brown spots, but still firm to the touch.
The white chocolate versus yogurt debate for Halloween mummy bananas is real. White chocolate looks more authentic and sets harder, but yogurt is healthier and cheaper. I’ve done both, and honestly, kids don’t care as long as it looks like mummy bandages.
The Step-by-Step (With My Decorating Disasters)
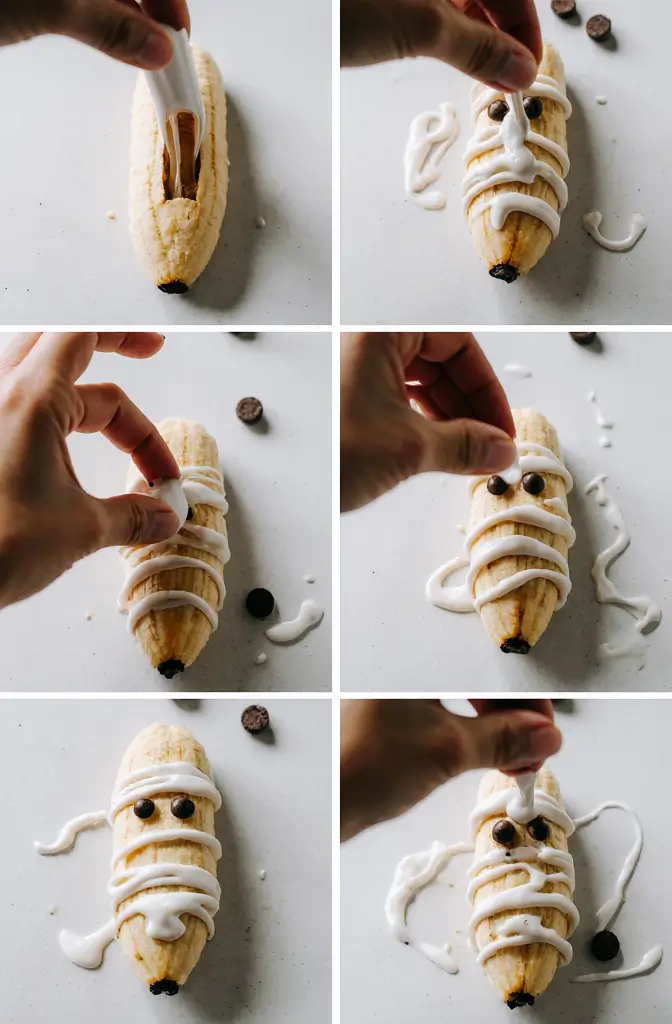
Step 1: Prep Your Bananas
Peel your bananas and cut them in half if they’re really long—you want Halloween mummy bananas that are easy for little hands to hold and eat. If you’re using popsicle sticks, gently insert them about halfway up the banana. Don’t push too hard or you’ll split the banana and have to start over.
I learned the hard way to do all my banana prep first before starting the coating process. Once you have melted chocolate or yogurt mixture, you want to work quickly for the best-looking mummy bananas.
Step 2: Make Your Mummy Wrapping Material
For White Chocolate Version: Melt white chocolate chips with coconut oil in 30-second intervals in the microwave, stirring between each interval. The coconut oil helps it stay smooth and makes it easier to drizzle for your mummy bananas bandages.
For Yogurt Version: Mix Greek yogurt with honey until smooth. Add a tiny bit of vanilla if you want. This version needs to be used right away since yogurt doesn’t set like chocolate does for Halloween mummy bananas.
Step 3: The Bandage Wrapping Technique
Here’s where mummy bananas can go wrong if you’re not careful. You don’t want to completely cover the banana—mummies have gaps in their bandages where you can see the “body” underneath.
For white chocolate mummy bananas: Use a spoon to drizzle the melted chocolate in horizontal lines across the banana, leaving gaps. Don’t worry about making it perfect—messier actually looks more authentic for mummy bandages.
For yogurt mummy bananas: Use a knife or offset spatula to spread yogurt in uneven horizontal strips. The yogurt version is more forgiving because you can adjust it before it sets.
Let some of the “bandages” overlap and vary the thickness. Real mummies would have inconsistent wrapping, so your mummy bananas should too.
Step 4: The Eyes That Make or Break It
Before your coating sets completely, add the eyes. This is crucial timing for Halloween mummy bananas—too early and the eyes sink in, too late and they won’t stick.
Place two mini chocolate chips or cut raisins where you left a gap in the bandages. I usually do this about 2-3 minutes after applying the coating for white chocolate mummy bananas, immediately for the yogurt version.
The eyes don’t have to be perfectly even. Actually, slightly mismatched eyes make mummy bananas look more character-filled and less artificial.
My Halloween Mummy Bananas Variations
The Coconut Mummy: Roll your coated mummy bananas in shredded coconut while the coating is still wet. Creates this cool textured bandage effect that kids think is amazing.
The Chocolate Drizzle Mummy: Use regular chocolate to make brown “ancient” bandages for Halloween mummy bananas. Less traditional but actually really cool looking.
The Frozen Version: Make your mummy bananas and freeze them for 30 minutes. They become like healthy ice cream pops that happen to look like mummies.
The Pretzel Arm Mummy: Stick pretzel pieces into the sides for arms. Makes your Halloween mummy bananas look like they’re reaching out, which is either cute or terrifying depending on your perspective.
What I’ve Learned About Halloween Mummy Bananas Success
Timing is Everything: Work in small batches for Halloween mummy bananas. If you try to do too many at once, the coating starts setting before you can add eyes, and you end up with weird-looking results.
Less is More: Don’t over-decorate your Halloween mummy bananas. A few strategic bandage lines and two eyes are all you need. More decorations just make them look busy instead of mummy-like.
Room Temperature Matters: If your bananas are cold from the fridge, the white chocolate will set too quickly and be hard to work with for Halloween mummy bananas. Let them come to room temperature first.
Storage Strategy: Halloween mummy bananas are best eaten within a few hours of making them. Bananas start browning and the decorations can get weird if they sit too long.
Halloween Mummy Bananas Troubleshooting
Coating Won’t Stick: Your banana might be too wet from washing or too cold. Pat them dry and let them warm up to room temperature before decorating your Halloween mummy bananas.
Eyes Keep Falling Off: You’re adding them too late after the coating has set. Add the eyes while the coating is still slightly wet for Halloween mummy bananas that stay together.
Bandages Look Messy: That’s actually good for Halloween mummy bananas! Real mummy wrappings would be uneven and aged. Don’t stress about perfection.
White Chocolate Too Thick: Add a tiny bit more coconut oil and reheat gently. Too-thick coating is hard to drizzle properly for Halloween mummy bananas.
The Real Talk About Halloween Mummy Bananas
These aren’t going to win any elaborate Halloween decoration contests, but they will make kids happy and give you something healthy to serve at Halloween parties. I love that Halloween mummy bananas let me participate in the Halloween fun without completely abandoning nutrition or spending a fortune on specialty ingredients.
My kids’ friends always get excited when they see Halloween mummy bananas at our parties, and parents appreciate having a healthier option among all the candy and cookies. It’s a win-win situation that doesn’t require advanced crafting skills.
The best part about Halloween mummy bananas is that they’re forgiving. If one doesn’t turn out perfect, it still looks like a mummy—just maybe a mummy that got caught in a windstorm or something. Kids think that’s even funnier.
Making Halloween Mummy Bananas a Tradition
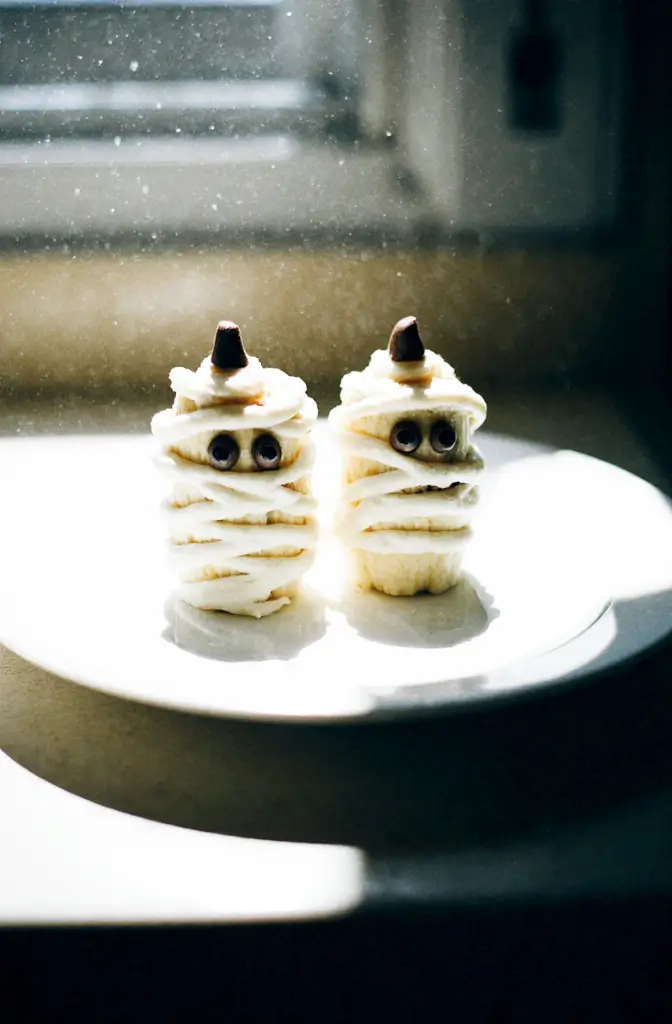
Start simple and don’t overthink it. The first time I made Halloween mummy bananas, I stressed about making them look exactly like the Pinterest photos. Now I know that imperfect mummies are actually more charming.
Get the kids involved in making Halloween mummy bananas. They can help with placing eyes, and they’re way less critical about perfection than adults are. Plus, they’re more likely to eat something they helped create.
Make extra because people will eat more Halloween mummy bananas than you expect. They look like a novelty treat but taste like a healthy snack, so people keep going back for more.
These Halloween mummy bananas have become one of my favorite easy Halloween traditions. They’re simple enough that I don’t dread making them, cute enough that kids get excited, and healthy enough that I don’t feel guilty about serving them.
Give these Halloween mummy bananas a try this Halloween season and see if they don’t become part of your regular rotation. Let me know what variations you come up with! Now I’m craving these and Halloween is still months away… 🍌👻
check out more Halloween appetizers : 20 Spooky Halloween Appetizers That’ll Actually Get Eaten (Not Just Instagrammed)
Halloween Mummy Bananas
Easy Halloween mummy bananas made with just 3 ingredients! Healthy Halloween treat perfect for parties. Bananas wrapped in white chocolate 'bandages' with chocolate chip eyes - kids love them!
Ingredients
- 4-6 ripe bananas
- 1 cup white chocolate chips
- 1 tablespoon coconut oil
- Mini chocolate chips for eyes
- Popsicle sticks (optional)
Instructions
-
Step 1Peel bananas and cut in half if very long. Insert popsicle sticks halfway up each banana if using.
-
Step 2Melt white chocolate chips with coconut oil in microwave in 30-second intervals, stirring between each interval until smooth.
-
Step 3Let chocolate cool slightly so it's not too hot but still pourable.
-
Step 4Use a spoon to drizzle melted white chocolate in horizontal lines across bananas, leaving gaps between 'bandages' and avoiding complete coverage.
-
Step 5Before chocolate sets completely (about 2-3 minutes), place two mini chocolate chips in a gap for mummy eyes.
-
Step 6Allow chocolate to set completely, about 10 minutes at room temperature.
-
Step 7Serve immediately or within a few hours for best appearance and taste.