

Okay, so I’ve been making these Halloween Vampire Bite Cupcakes for like three years now, and every single time someone asks me for the recipe. Last Halloween, my neighbor literally knocked on my door at 9 PM asking how I made them because her kids wouldn’t stop talking about them. So here goes nothing—I’m finally writing this down.
Look, I’m gonna be honest with you. The first time I tried making these? Complete disaster. The “blood” was too runny, the cupcakes were dry, and they looked more like crime scene evidence than cute Halloween treats. But here’s the thing—I’m stubborn, and I was determined to nail these Halloween Vampire Bite Cupcakes.
How I Discovered These Amazing Halloween Vampire Bite Cupcakes
So this whole obsession started when my 7-year-old came home from school talking about these cupcakes her friend’s mom made. “Mom, they had REAL bite marks and blood!” she said, practically bouncing off the walls. And you know how competitive us parents can get… I mean, I wasn’t about to be outdone by Sarah’s mom, right?
I spent hours scrolling Pinterest and food blogs, but honestly? Most of the Halloween Vampire Bite Cupcakes recipes I found were either way too complicated or just didn’t look realistic enough. Some people use strawberry jam for blood (ew, chunky), others use food coloring that looks fake as anything.
Actually, you know what? I think my obsession with getting these perfect comes from my childhood. My mom used to go ALL OUT for Halloween—I’m talking haunted house in our garage, fog machines, the works. So when it comes to Halloween treats, I don’t mess around.
What Makes These Halloween Vampire Bite Cupcakes So Special
The secret is in the details, people. And trust me, I learned this the hard way after several failed attempts that my family still brings up at dinner parties.
First off, the cupcakes themselves need to be dark and rich—like, vampire-worthy dark. I use a chocolate cupcake base, but not just any chocolate. We’re talking deep, dark chocolate that looks almost black when it’s done. Perfect for Halloween Vampire Bite Cupcakes.
The frosting? That’s where the magic happens. Most people just slap on some white buttercream and call it a day. But real vampire bite marks aren’t perfectly white, are they? They’re more like… okay, this is gonna sound weird, but like pale skin with shadows and depth.
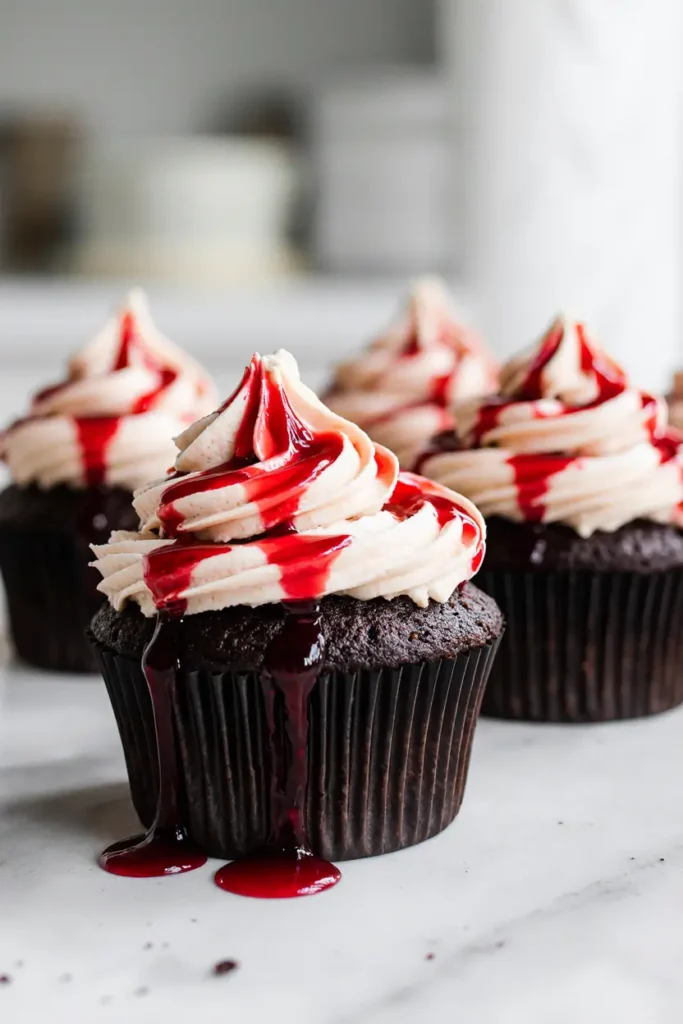
And the blood. Oh my gosh, the BLOOD. This took me forever to get right. It can’t be too thick (looks like paint), can’t be too thin (runs everywhere), and it absolutely cannot taste gross because kids will notice. My Halloween Vampire Bite Cupcakes use a raspberry reduction that’s thick enough to stay put but still looks disturbingly realistic.
The Great Cupcake Disaster of 2022
Okay, storytime. Last year, I was making these Halloween Vampire Bite Cupcakes for my daughter’s class party. Everything was going perfectly—cupcakes looked amazing, frosting was on point, blood was the perfect consistency. I was feeling pretty proud of myself.
Then I decided to get fancy with the bite marks. Instead of using my tried-and-true method (which I’ll tell you about in a sec), I thought I’d try using actual vampire teeth molds I found online. Seemed like a brilliant idea at the time.
Disaster. Complete disaster.
The molds were too deep, the frosting stuck to them, and when I tried to pull them out, half the frosting came with it. I had 24 mutilated cupcakes and exactly 45 minutes before I had to leave for school.
I almost cried. Actually, I think I did cry a little bit because my husband found me in the kitchen going “why did I think this was a good idea?” while frantically trying to re-frost everything.
But you know what? Sometimes disasters lead to discoveries. Because I was in panic mode, I just grabbed a regular old butter knife and started making bite marks the simple way. And they looked BETTER than the fancy mold ones. Way more realistic and way less stressful.
Ingredients for Perfect Halloween Vampire Bite Cupcakes

Here’s what you need, and I’m gonna tell you about each ingredient because some of these choices matter more than you’d think:
For the Cupcakes:
- 1¾ cups all-purpose flour
- 2 cups sugar
- ¾ cup dark cocoa powder (not regular cocoa—go dark or go home)
- 2 teaspoons baking soda
- 1 teaspoon baking powder
- 1 teaspoon salt
- 2 large eggs
- 1 cup buttermilk (trust me, don’t substitute this)
- 1 cup strong black coffee, cooled (yes, coffee in cupcakes—it makes the chocolate taste more chocolatey)
- ½ cup vegetable oil
- 1 teaspoon vanilla extract
For the “Pale Skin” Frosting:
- 1 cup butter, softened (real butter, not margarine)
- 4-5 cups powdered sugar
- ¼ cup heavy cream
- 1 teaspoon vanilla extract
- Tiny bit of cocoa powder (for that slightly grayish pale look)
For the “Blood”:
- 1 cup fresh or frozen raspberries
- ¼ cup sugar
- 1 tablespoon cornstarch
- 2 tablespoons water
A quick note about ingredients—I always buy the good cocoa powder for these Halloween Vampire Bite Cupcakes. I know it’s more expensive, but cheap cocoa powder tastes like… well, like disappointment. And please, PLEASE use real butter for the frosting. I tried margarine once when I was out of butter and my mother-in-law actually asked if I was feeling okay because they tasted so weird.
Oh, and about the coffee—I know some people freak out about putting coffee in cupcakes that kids will eat, but it’s not actually coffee flavored. It just makes the chocolate taste incredible. My neighbor’s kids have no idea there’s coffee in there, and they’ve been eating these Halloween Vampire Bite Cupcakes for years.
Making the Perfect Halloween Vampire Bite Cupcakes
Step 1: Cupcake Base
Preheat your oven to 350°F. I always forget this step and then have to wait around like an idiot, so do it first.
Mix all your dry ingredients in a big bowl. And I mean BIG bowl—learned this lesson when flour went everywhere because I was trying to be economical with bowl space.
In another bowl, whisk together eggs, buttermilk, coffee (make sure it’s cooled!), oil, and vanilla. The coffee might look weird mixed with the buttermilk. That’s normal. Don’t panic like I did the first time.
Pour wet ingredients into dry ingredients and mix until just combined. The batter will be thin—like, concerning thin. First time I made these, I was convinced I messed up because every other cupcake batter I’d made was thick. But this thin batter is what gives you incredibly moist Halloween Vampire Bite Cupcakes.
Fill cupcake liners about 2/3 full and bake for 18-22 minutes. Test with a toothpick—it should come out clean or with just a few moist crumbs.
Step 2: The Blood (Make This While Cupcakes Cool)
This is where things get fun and slightly gross. Put raspberries and sugar in a small saucepan over medium heat. Stir until berries break down and get juicy—takes about 5 minutes.
Mix cornstarch and water in a small cup until smooth. Add this to your raspberry mixture and stir constantly for 2-3 minutes until it thickens. It should coat the back of a spoon but still drip slowly.
Strain through a fine mesh strainer to remove seeds. This step is crucial for realistic-looking blood in your Halloween Vampire Bite Cupcakes. Seeds make it look like jam, not blood.
Let it cool completely. And I mean completely—warm blood will melt your frosting and create a mess that’s more horror movie than cute Halloween treat.
Step 3: Pale Skin Frosting
Beat butter until light and fluffy—like, really go to town on it. This takes longer than you think, probably 4-5 minutes with an electric mixer.
Gradually add powdered sugar, alternating with cream. Add vanilla and just a tiny pinch of cocoa powder. You want the frosting to be slightly off-white, like pale skin, not stark white.
The consistency should be firm enough to hold its shape but soft enough to pipe smoothly. If it’s too thick, add more cream. Too thin? More powdered sugar.
Step 4: Creating the Vampire Bites
Here’s where the magic happens with these Halloween Vampire Bite Cupcakes. Frost each cupcake with a smooth dome of frosting—don’t worry about making it perfect, real skin isn’t perfect.
Now for the bite marks. Take a butter knife (clean, obviously) and make two small indentations about ½ inch apart. Press down and slightly twist to create that realistic puncture wound look. The indentations should be deep enough to hold the blood but not so deep they go through to the cupcake.
Some people use their actual teeth for this step. I tried it once and nearly chipped a tooth on the butter knife handle. Not recommended.
Step 5: Adding the Blood
This is the moment of truth for your Halloween Vampire Bite Cupcakes. Using a small spoon or squeeze bottle, carefully fill each bite mark with your cooled raspberry blood. Let it pool slightly and drip down one side—that’s what makes it look realistic.
Don’t go crazy with the blood. A little goes a long way, and too much makes it look cartoonish instead of eerily realistic.
My Hard-Learned Tips for Halloween Vampire Bite Cupcakes
Temperature Matters: Make sure everything is the right temperature. Warm cupcakes will melt frosting. Warm blood will thin out and run everywhere. Room temperature ingredients mix better. I keep notes now because I’m terrible at remembering this stuff.
Practice Your Bite Marks: Before you start on your good cupcakes, practice the bite mark technique on a practice cupcake or even just a bowl of frosting. The first few always look weird until you get the hang of it.
Make Extra Blood: You’ll use more than you think, and it’s annoying to have to make another batch halfway through decorating. Plus, it keeps in the fridge for a few days if you want to make more Halloween Vampire Bite Cupcakes later.
Storage: These actually taste better the next day after the flavors meld together. Store them in the fridge because of the raspberry blood, but bring them to room temperature before serving.
When Things Go Wrong (They Will)
Look, I’ve made these Halloween Vampire Bite Cupcakes probably 50 times now, and I still occasionally mess something up. Here’s how to fix the most common problems:
Blood Too Runny: Add a tiny bit more cornstarch mixed with cold water. Cook for another minute until it thickens.
Frosting Too Sweet: Add a pinch of salt. Sounds weird, but it balances everything out.
Bite Marks Look Fake: You’re probably being too neat. Real bite marks are slightly irregular and different sizes.
Cupcakes Dry: Next time, don’t overbake them. Also, that coffee in the batter helps prevent dryness, so don’t skip it.
Why These Halloween Vampire Bite Cupcakes Are Worth the Effort
I know this seems like a lot of work for cupcakes. And honestly, some days when I’m elbow-deep in raspberry blood and frosting, I wonder why I don’t just buy Halloween cupcakes from the store like a normal person.
But then I see my kids’ faces when they see these Halloween Vampire Bite Cupcakes. Or I watch their friends’ reactions at the Halloween party. Or I get texts from other parents asking for the recipe because their kids are still talking about them days later.
That’s when I remember why I spent three years perfecting these ridiculous, over-the-top, slightly disturbing cupcakes.
Plus, let’s be real—they taste amazing. The dark chocolate cupcakes are rich and moist, the pale frosting is perfectly sweet and creamy, and the raspberry blood adds this bright, tangy contrast that makes the whole thing addictive.
My husband, who claims he doesn’t like “fancy” desserts, has been known to sneak these Halloween Vampire Bite Cupcakes from the fridge at midnight. When I catch him, he just shrugs and says “they’re really good” with his mouth full of cupcake.
Final Thoughts on These Halloween Vampire Bite Cupcakes
If you’re still reading this, you’re probably either really committed to making awesome Halloween treats or you’re procrastinating something else. Either way, I’m glad you’re here.
These Halloween Vampire Bite Cupcakes aren’t the easiest thing you’ll ever make, but they’re definitely not the hardest either. And the payoff is so worth it. There’s something deeply satisfying about creating something that makes people go “oh my gosh, how did you DO that?”
Just remember—it doesn’t have to be perfect. My first batch looked like a Halloween massacre scene, and people still ate them all. Food is about bringing people together and making them smile, even if that smile is slightly horrified.
So go ahead, give these Halloween Vampire Bite Cupcakes a try. And when people ask you how you made them (they will), just smile mysteriously and tell them it’s an old family recipe. Or send them this post—I don’t mind sharing my hard-won cupcake wisdom.
Happy baking, and may your Halloween Vampire Bite Cupcakes be deliciously spooky! 🧛♀️
Let me know in the comments how your Halloween Vampire Bite Cupcakes turn out—I love seeing everyone’s creative variations!
check also this Vegan Blueberry Ghost Hand Pies That’ll Haunt Your Taste Buds (In the Best Way) for your inspiration.
The Best Halloween Vampire Bite Cupcakes
Spookily realistic Halloween Vampire Bite Cupcakes with dark chocolate base, pale buttercream frosting, and raspberry 'blood' that drips from realistic bite marks. Perfect for Halloween parties and guaranteed to impress.
Ingredients
- 1¾ cups all-purpose flour
- 2 cups sugar
- ¾ cup dark cocoa powder
- 2 teaspoons baking soda
- 1 teaspoon baking powder
- 1 teaspoon salt
- 2 large eggs
- 1 cup buttermilk
- 1 cup strong black coffee, cooled
- ½ cup vegetable oil
- 1 teaspoon vanilla extract
- 1 cup butter, softened
- 4-5 cups powdered sugar
- ¼ cup heavy cream
- 1 teaspoon vanilla extract
- Tiny bit of cocoa powder
- 1 cup fresh or frozen raspberries
- ¼ cup sugar
- 1 tablespoon cornstarch
- 2 tablespoons water
Instructions
-
Step 1Preheat oven to 350°F. Mix dry ingredients in large bowl. Whisk wet ingredients separately. Combine wet and dry ingredients until just mixed. Fill cupcake liners 2/3 full and bake 18-22 minutes until toothpick comes out clean.
-
Step 2Cook raspberries and sugar in saucepan over medium heat for 5 minutes until berries break down. Mix cornstarch and water, add to berries and stir 2-3 minutes until thickened. Strain to remove seeds and cool completely.
-
Step 3Beat butter until fluffy, 4-5 minutes. Gradually add powdered sugar alternating with cream. Add vanilla and tiny pinch of cocoa powder for pale skin color.
-
Step 4Frost each cooled cupcake with smooth dome of pale frosting.
-
Step 5Using butter knife, make two small indentations about ½ inch apart in frosting. Press down and slightly twist to create realistic puncture wounds.
-
Step 6Using small spoon, carefully fill each bite mark with cooled raspberry blood. Let it pool and drip slightly down one side for realistic effect.