
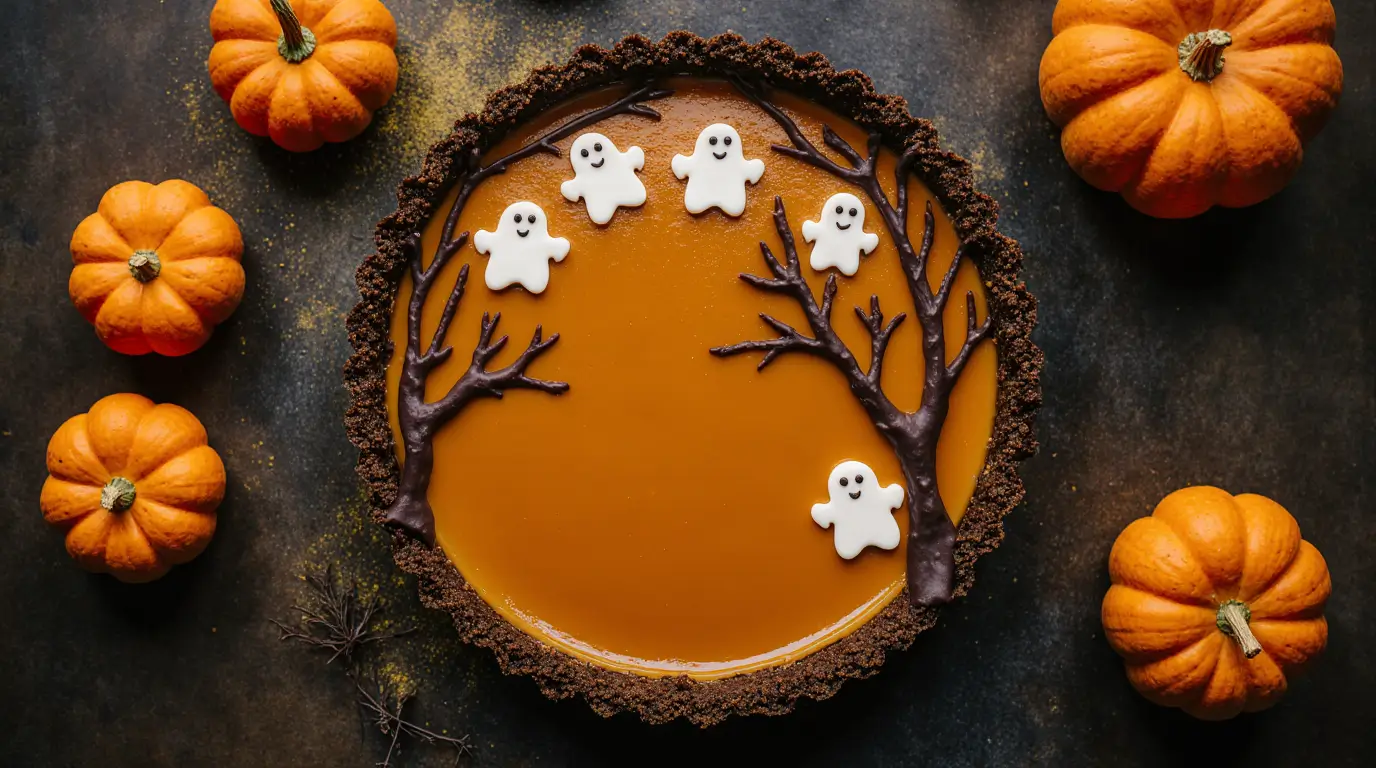
Haunted pumpkin patch pie has become the showstopper of my Halloween dessert table, and honestly, I can’t believe how simple it is to make something that looks this impressive. This haunted pumpkin patch pie is basically a dressed-up pumpkin pie with some chocolate “branches” and white chocolate “ghosts” that make everyone think you’re some kind of baking wizard. But between you and me? It’s mostly just regular pumpkin pie with some creative decorating.
I first saw something like this haunted pumpkin patch pie on Instagram last October and immediately saved it to my “recipes I’ll never actually make” folder. You know the one—it’s full of gorgeous desserts that require seventeen specialty ingredients and professional pastry skills. But then my sister announced she was hosting Halloween dinner and asked everyone to bring something “festive,” and I panicked. I needed a haunted pumpkin patch pie that looked impressive but wouldn’t require me to take a semester at culinary school.
So I did what any reasonable person would do—I took my mom’s basic pumpkin pie recipe (the one that’s never failed me) and figured out how to make it look spooky. Three attempts later, I had this haunted pumpkin patch pie that made my sister’s guests gasp when I walked in with it. And the best part? It tasted even better than it looked, which is saying something because this thing photographs like a magazine cover.
My Haunted Pie Adventure (From Pinterest Panic to Success)
The first version of my haunted pumpkin patch pie was… ambitious. I tried to make homemade chocolate decorations using molds I ordered online, attempted sugar work for the first time in my life (why?), and spent about four hours on decorations that looked nothing like the inspiration photo. The pie itself was fine, but the “haunted” part looked more like a toddler had attacked it with Halloween candy.
Version 2.0 was smarter—I used melted chocolate and a piping bag for the branches, which actually worked pretty well. But I still tried to get too fancy with the ghost decorations, attempting to make them from scratch with white chocolate and coconut oil. They melted under the kitchen lights before I even got to the party. My husband found me at 6 PM frantically trying to re-chill misshapen ghosts while muttering about food photography being a scam.
The winning version happened when I embraced shortcuts. Store-bought white chocolate ghosts (just melted white chocolate dropped onto parchment and shaped quickly), simple chocolate branch designs, and focusing on making the actual haunted pumpkin patch pie taste incredible. Sometimes the best solutions are the simplest ones, and this haunted pumpkin patch pie proves that point perfectly.
Actually, you know what? The real breakthrough was when I stopped trying to make it look exactly like the Pinterest version. My branches are wonkier, my ghosts are more abstract, but somehow that makes this haunted pumpkin patch pie look more authentically spooky and less like a factory-made Halloween decoration.
What Makes This Haunted Pumpkin Patch Pie Special
Here’s the thing about this haunted pumpkin patch pie—it’s really just an excellent pumpkin pie with some Halloween flair. The base recipe is foolproof (I’ve been making it for eight years without a single failure), and the spooky decorations are way easier than they look.
The haunted pumpkin patch pie starts with a chocolate graham cracker crust because regular graham crackers look too cheerful for Halloween. Plus, chocolate and pumpkin are an amazing combination that more people should discover. The filling is classic pumpkin pie—smooth, creamy, perfectly spiced—but I add a touch of coffee to deepen the flavor and make it more “mysterious.”
What makes this haunted pumpkin patch pie work is the decorating technique. You’re not trying to create realistic trees and ghosts—you’re going for that spooky, stylized look that’s clearly homemade but still impressive. The chocolate branches are just melted chocolate piped in organic, twisty patterns. The ghosts are simple white chocolate shapes with mini chocolate chip eyes.
The whole haunted pumpkin patch pie comes together to tell a little Halloween story on your dessert plate, but each component is totally doable even if you’re not particularly artistic. I mean, if I can make this look good, literally anyone can.
Ingredients for Your Haunted Pumpkin Patch Pie
Shopping for this haunted pumpkin patch pie is mostly standard pumpkin pie ingredients plus a few Halloween extras. The only thing that might require a special trip is the chocolate graham crackers—some stores don’t carry them year-round, so you might need to crush up chocolate cookies instead.
For the crust:
- 1½ cups chocolate graham cracker crumbs (about 12 crackers)
- ⅓ cup melted butter
- 3 tablespoons sugar
For the pumpkin filling:
- 1 (15 oz) can pumpkin puree (not pie filling—learned that lesson the hard way)
- ¾ cup brown sugar
- 3 large eggs
- 1 (12 oz) can evaporated milk
- 1 teaspoon vanilla extract
- 1 teaspoon ground cinnamon
- ½ teaspoon ground ginger
- ¼ teaspoon nutmeg
- ¼ teaspoon ground cloves
- ½ teaspoon salt
- 1 tablespoon instant coffee (optional, but trust me)
For the haunted decorations:
- 4 oz dark chocolate chips
- 3 oz white chocolate chips
- Mini chocolate chips for ghost eyes
A crucial note about the pumpkin for this haunted pumpkin patch pie—make sure you’re getting pure pumpkin puree, not pumpkin pie filling. I grabbed the wrong can once and couldn’t figure out why my pie was weirdly sweet and over-spiced. The pie filling already has sugar and spices added, which throws off the whole recipe.
The instant coffee sounds weird in a haunted pumpkin patch pie, but it doesn’t make it taste like coffee. It just deepens the pumpkin flavor and adds this subtle complexity that makes people ask what your secret ingredient is.
Making Your Haunted Pumpkin Patch Pie

Preheat your oven to 425°F first—this haunted pumpkin patch pie needs a hot start to set the crust properly. I always forget this step and then tap my foot impatiently while the oven heats up.
Step 1: Make the crust by mixing chocolate graham cracker crumbs, melted butter, and sugar. Press firmly into a 9-inch pie pan. I use the bottom of a measuring cup to really pack it down—loose crusts are sad crusts.
Step 2: Bake the crust for 8 minutes, then set aside to cool. This pre-baking step prevents a soggy bottom, which nobody wants in their haunted pumpkin patch pie.
Step 3: Whisk together all the filling ingredients in a large bowl until completely smooth. If you have lumps, strain the mixture—lumpy haunted pumpkin patch pie is not the kind of scary you’re going for.
Step 4: Pour the filling into the cooled crust and smooth the top. Bake at 425°F for 15 minutes, then reduce to 350°F and bake another 35-40 minutes until the center is almost set but still slightly jiggly.
The temperature reduction is crucial for this haunted pumpkin patch pie. High heat initially helps set the edges, but lower heat finishes the center without overcooking the outside. I used to bake the whole thing at 425°F and ended up with cracked, overcooked pies more times than I care to admit.
Step 5: Cool completely before decorating. This is torture because it smells amazing, but warm pie will melt your chocolate decorations instantly.
Creating the Haunted Decorations
This is where your haunted pumpkin patch pie transforms from regular dessert to Halloween centerpiece. Melt the dark chocolate in 30-second bursts in the microwave, stirring between each burst. Once it’s smooth, transfer to a piping bag or just a plastic bag with the corner cut off.
Pipe branch-like designs across the surface of your haunted pumpkin patch pie. Don’t stress about making them perfect—wonky branches look more realistic anyway. I usually do 4-5 branches spreading out from different points, kind of like bare winter trees.
For the ghosts, melt the white chocolate the same way and drop small amounts onto parchment paper. While they’re still soft, quickly shape them into simple ghost forms with a toothpick—just basic blob shapes with slightly wavy bottoms. Press mini chocolate chips into them for eyes while the chocolate is still warm.
Let the decorations set for about 10 minutes, then carefully transfer the ghosts to your haunted pumpkin patch pie, placing them around the chocolate branches like they’re floating through a spooky forest.
My Decoration Disasters and What I Learned
The decorating part of this haunted pumpkin patch pie took me several tries to figure out. My first attempt at chocolate branches looked more like someone had sneezed chocolate onto the pie. Turns out you need to let the chocolate cool slightly before piping, or it just spreads into blobs.
The ghost situation was initially a nightmare. I tried to make them too detailed and realistic, spending forever on tiny features that just looked muddy from a distance. Simple shapes work so much better for this haunted pumpkin patch pie—your brain fills in the spooky details automatically.
Pro tip I learned the hard way: make extra decorations. Some will break, some won’t look right, and some you’ll eat while you’re decorating because chocolate is chocolate. I always make about twice as many ghosts as I think I need for my haunted pumpkin patch pie.
Serving and Storing Your Haunted Pumpkin Patch Pie
This haunted pumpkin patch pie is best served chilled or at room temperature. The decorations hold up better when it’s cool, and honestly, the flavors are more balanced too. I usually take it out of the fridge about 30 minutes before serving so it’s not ice-cold.
Cut with a sharp knife wiped clean between slices—this keeps your haunted pumpkin patch pie looking neat and prevents the decorations from smearing. The chocolate branches will crack a bit when you cut through them, but that just adds to the spooky, broken-tree effect.
Store any leftover haunted pumpkin patch pie covered in the refrigerator for up to 4 days, though the decorations might lose some of their crispness after day two. Not that it matters much—this thing usually disappears within 24 hours at our house.

Why This Haunted Pumpkin Patch Pie Works
I think what makes this haunted pumpkin patch pie so successful is that it delivers on both the visual wow factor and the taste. It’s not just a gimmick—it’s actually a really good pumpkin pie that happens to look Halloween-appropriate.
The chocolate crust adds richness without overwhelming the pumpkin flavor, and the decorations are simple enough that you won’t spend all day on them but impressive enough that people will assume you’re way more talented than you actually are.
This haunted pumpkin patch pie has become my signature Halloween dessert, and I’ve probably made it fifteen times in the past two years for various parties and dinners. Every single time, people ask for the recipe and seem genuinely shocked when I tell them how straightforward it is.
Final Thoughts on This Haunted Pumpkin Patch Pie
Look, I’m not gonna pretend this haunted pumpkin patch pie is as easy as opening a box of cookies. It does take some time and a little bit of chocolate-melting patience. But the payoff is so worth it—you get to be the person who shows up to the Halloween party with the dessert that makes everyone stop and stare.
This haunted pumpkin patch pie bridges the gap between impressive and achievable, which is exactly what I want in a special occasion dessert. It looks like you spent all day on it, but most of the work is just regular baking with some fun decorating at the end.
Give this haunted pumpkin patch pie a try for your next Halloween gathering, and let me know how your decorating adventures go! I love hearing about other people’s creative touches and happy accidents.
try these Easy Peanut Butter Spider Cookies That Actually Look Like Spiders (No Pinterest Fails Here)
Happy haunting! 🥧👻
Haunted Pumpkin Patch Pie
A spooky Halloween twist on classic pumpkin pie featuring chocolate graham cracker crust, rich pumpkin filling, and decorative chocolate branches with white chocolate ghosts. Perfect showstopper dessert for Halloween parties.
Ingredients
- 1½ cups chocolate graham cracker crumbs
- ⅓ cup melted butter
- 3 tablespoons sugar
- 1 (15 oz) can pumpkin puree
- ¾ cup brown sugar
- 3 large eggs
- 1 (12 oz) can evaporated milk
- 1 teaspoon vanilla extract
- 1 teaspoon ground cinnamon
- ½ teaspoon ground ginger
- ¼ teaspoon nutmeg
- ¼ teaspoon ground cloves
- ½ teaspoon salt
- 1 tablespoon instant coffee (optional)
- 4 oz dark chocolate chips
- 3 oz white chocolate chips
- Mini chocolate chips for ghost eyes
Instructions
-
Step 1Preheat oven to 425°F (220°C). Mix chocolate graham cracker crumbs, melted butter, and sugar. Press firmly into 9-inch pie pan.
-
Step 2Pre-bake crust for 8 minutes, then remove and let cool while preparing filling.
-
Step 3In a large bowl, whisk together pumpkin puree, brown sugar, eggs, evaporated milk, vanilla, and all spices until completely smooth.
-
Step 4Pour pumpkin filling into cooled crust and smooth the surface.
-
Step 5Bake at 425°F for 15 minutes, then reduce temperature to 350°F and continue baking 35-40 minutes until center is almost set.
-
Step 6Cool pie completely to room temperature, then refrigerate for at least 2 hours before decorating.
-
Step 7Melt dark chocolate and pipe branch designs across the pie surface using a piping bag or plastic bag with corner cut off.
-
Step 8Melt white chocolate and drop small amounts onto parchment paper. Quickly shape into ghost forms and add mini chocolate chip eyes.
-
Step 9Once chocolate decorations are set, carefully place white chocolate ghosts around the chocolate branches on the pie surface.