

Peanut butter cherry chia jam cups are hands down the best thing I’ve made all month, and that’s saying something because I’ve been on a serious baking kick lately. Look, I’m gonna be real with you—I only started making these peanut butter cherry chia jam cups because I was too cheap to buy actual jam and had a bag of chia seeds that I impulse-bought six months ago and forgot about.
But here’s the thing about peanut butter cherry chia jam cups: they’re like fancy PB&J that grew up, got a college degree, and started doing yoga. The cherry chia jam part tastes better than anything you’ll find in a jar, and the peanut butter layer is creamy and rich without being crazy sweet. Plus, you get to feel all superior about making your own jam, which is honestly half the appeal.
These peanut butter cherry chia jam cups happened because I was scrolling Pinterest at 11 PM (dangerous territory) and saw some elaborate layered dessert that looked impossible. So naturally, I thought, “I bet I can make a lazy version of this that actually tastes good.” Sometimes my best recipes come from being too stubborn to admit something looks too complicated.
Why Peanut Butter Cherry Chia Jam Cups Are My New Obsession
The beauty of peanut butter cherry chia jam cups is that they solve multiple problems at once. First, they use up those expensive chia seeds that have been giving you guilt trips from your pantry. Second, they taste like dessert but have actual nutritional value. And third, they make you look like you have your life together when people see them in your fridge.
I’ve tried making these peanut butter cherry chia jam cups with different berry combinations—strawberries are okay, mixed berries work fine—but something about cherries just hits different. Maybe it’s because they’re tart enough to balance out the richness of the peanut butter? I don’t know, I’m not a flavor scientist, but trust me on this one.
The texture is what really gets me. The chia jam has this amazing thick, jammy consistency that’s way better than the weird gelatinous stuff they put in store-bought jam. And the peanut butter layer stays creamy but firms up just enough that you can eat these peanut butter cherry chia jam cups with a spoon without making a mess.
The Real Story Behind These Peanut butter Cherry Chia Jam Cups
So here’s how I accidentally became obsessed with peanut butter cherry chia jam cups. I was trying to eat healthier (classic Sunday night resolution), and I kept seeing these fancy chia pudding things on Instagram. But every recipe I found was either too complicated or called for ingredients I’d never heard of.
Then I remembered I had a bag of frozen cherries in my freezer that I’d bought with good intentions for smoothies but never used. And obviously I always have peanut butter because I’m not a monster. The chia jam part was born out of pure stubbornness—I was not paying $6 for organic jam when I could probably figure it out myself.
First attempt was… educational. I didn’t let the chia jam cool down enough before adding the peanut butter layer, so it basically melted into this weird swirled mess. Still tasted good, but looked like I’d given up halfway through. Second attempt, I learned patience. These peanut butter cherry chia jam cups are all about the layers, and layers need time to set properly.
What You Actually Need for Perfect Peanut Butter Cherry Chia Jam Cups

For the cherry chia jam (the star of the show):
- 1 1/2 cups frozen cherries (fresh work too but frozen are cheaper)
- 3 tablespoons chia seeds
- 2 tablespoons pure maple syrup (or honey if you prefer)
- 1 tablespoon fresh lemon juice
- Pinch of salt (trust me on this)
- 1/2 teaspoon vanilla extract (optional but nice)
For the peanut butter layer (creamy perfection):
- 3/4 cup natural peanut butter (the kind that separates, not Jif)
- 1/3 cup full-fat coconut milk (the thick stuff from the can)
- 2 tablespoons maple syrup
- 1 teaspoon vanilla extract
- Tiny pinch of salt
- 1 tablespoon coconut oil, melted (helps it set)
For serving (because presentation matters):
- Small mason jars or glasses
- Maybe some crushed peanuts for topping
- Extra cherries if you’re feeling fancy
The key to amazing peanut butter cherry chia jam cups is using good peanut butter. None of that hydrogenated oil stuff—you want the real deal that separates and tastes like actual peanuts. And don’t skip the coconut milk; it’s what makes the peanut butter layer creamy instead of thick and gloppy.
How to Make Peanut Butter Cherry Chia Jam Cups (The Non-Fancy Way)
Step 1: Make the magic chia jam Start with the cherry chia jam because it needs the most time to set. Throw the frozen cherries in a medium saucepan over medium heat. Don’t add water—the cherries will release their own juices as they thaw and cook down. This takes about 5-7 minutes.
Once the cherries start breaking down and getting jammy, mash them up with a fork or potato masher. I like to leave some chunks because texture is good, but mash them to your preferred consistency. Stir in the maple syrup, lemon juice, and that pinch of salt.
Now comes the chia magic. Remove the pan from heat and stir in the chia seeds. They’ll look weird and foreign at first, but don’t panic. Let this mixture sit for about 10 minutes, stirring every few minutes. The chia seeds will absorb the cherry juices and create this incredible gel-like consistency that’s way better than store-bought jam.
Add the vanilla if you’re using it, give it one final stir, and let the chia jam cool completely. This is crucial for proper peanut butter cherry chia jam cups—if the jam is even slightly warm, it’ll melt your peanut butter layer and ruin the whole aesthetic.
Step 2: Peanut butter layer perfection While your chia jam is cooling (patience, grasshopper), make the peanut butter layer. If your peanut butter is separated, stir it up first. Then mix it with the coconut milk, maple syrup, vanilla, and salt until it’s smooth and creamy.
The melted coconut oil goes in last—drizzle it in while whisking so it incorporates evenly instead of clumping up. The mixture should be thick but pourable. If it’s too thick, add another splash of coconut milk. If it’s too thin, just wait a few minutes for the coconut oil to firm up slightly.
Step 3: Assembly time for your peanut butter cherry chia jam cups Once your chia jam is completely cool, it’s layering time. I use small mason jars because they’re cute and stackable, but any small glasses work. Start with a generous spoonful of cherry chia jam at the bottom of each jar.
Then carefully spoon or pour the peanut butter mixture over the jam. I use a small spoon and go slowly around the edges so the layers stay distinct. You want clear, Instagram-worthy layers in your peanut butter cherry chia jam cups, not a muddy mess.
If you’re feeling extra, top with a final dollop of chia jam or some crushed peanuts. Or just leave them simple—they’re beautiful either way.
Step 4: The hardest part (waiting) Refrigerate your peanut butter cherry chia jam cups for at least 2 hours, but preferably overnight. The chia jam needs time to fully gel, and the peanut butter layer firms up beautifully in the cold. I know waiting sucks, but trust the process.
Pro Tips for Next-Level Peanut Butter Cherry Chia Jam Cups
Chia jam consistency: If your jam ends up too thick, thin it out with a splash of water or lemon juice. Too thin? Add more chia seeds and let it sit longer. The chia seeds will continue absorbing liquid even after you think they’re done.
Peanut butter layer tricks: Room temperature ingredients mix better. If your peanut butter is cold and stiff, microwave it for 10-15 seconds to soften it up. But don’t make it hot or it’ll melt when you add the coconut oil.
Make-ahead magic: These peanut butter cherry chia jam cups actually taste better after sitting in the fridge overnight. The flavors meld together, and the textures get perfect. I usually make them on Sunday and eat them throughout the week.
Flavor variations: Sometimes I add a tiny bit of almond extract to the peanut butter layer, or use almond butter instead of peanut butter. You could also try different berries in the chia jam, but honestly, the cherry version is perfection.
Why These Peanut Butter Cherry Chia Jam Cups Actually Work
The thing about peanut butter cherry chia jam cups is that they hit all the right notes without trying too hard. The cherry chia jam is tart and fruity, the peanut butter layer is rich and satisfying, and together they taste like the world’s most sophisticated PB&J.
Plus, they’re actually good for you. Chia seeds are loaded with fiber and omega-3s, cherries have antioxidants, and peanut butter provides protein and healthy fats. So you can eat these peanut butter cherry chia jam cups for breakfast, snack, or dessert and feel good about all your life choices.
The best part is how they look. When people see these layered beauties in your fridge, they assume you spent hours making them. In reality, most of the work is just waiting for things to cool and set, which you can do while binge-watching Netflix.
Storage and Serving Your Peanut Butter Cherry Chia Jam Cups
These peanut butter cherry chia jam cups keep in the fridge for up to a week, which makes them perfect for meal prep. I usually make a batch on Sunday and portion them into individual jars for grab-and-go breakfasts or afternoon snacks.
Serve them cold straight from the fridge—the textures are perfect when chilled. You can eat them with a spoon, or if you’re feeling fancy, serve them as dessert with some extra fresh cherries and maybe a drizzle of honey.
Sometimes I make mini versions in shot glasses for parties. People always ask for the recipe, and I love watching their faces when I tell them it’s basically just fruit, chia seeds, and peanut butter. Simple ingredients, fancy results.
The Real Talk About Making These
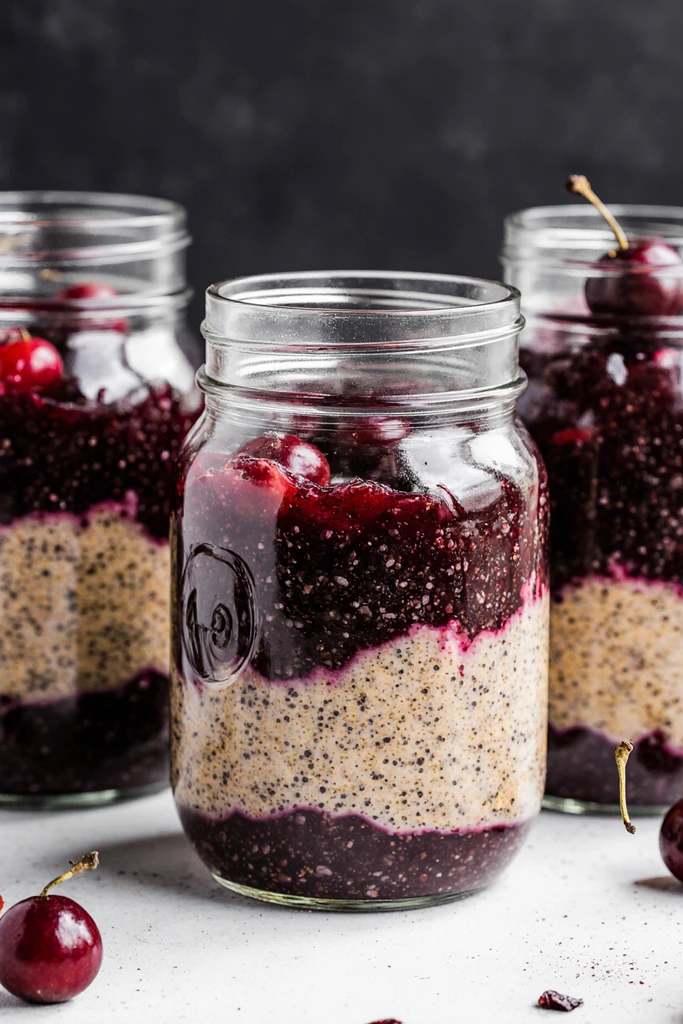
Look, I’m not gonna pretend these peanut butter cherry chia jam cups are as quick as grabbing a jar of Smucker’s from the store. The chia jam takes some time to cook and cool, and you need to plan ahead for the chilling time. But the actual hands-on work is maybe 20 minutes, and most of that is just stirring things in pans.
The first time I made peanut butter cherry chia jam cups, I was skeptical about the whole chia seed situation. They looked like tiny alien eggs floating in my jam, and I wasn’t sure how I felt about it. But once they gelled up and I tasted the final product, I was completely converted. Now I judge all store-bought jams against my homemade chia version, and they always lose.
My neighbor tried these and immediately asked for the recipe. Then she made them for her book club, and now apparently half the neighborhood is making their own chia jam. I’ve created a monster, but I’m not mad about it.
Final Thoughts on These Life-Changing Peanut Butter Cherry Chia Jam Cups
Honestly, these peanut butter cherry chia jam cups have completely changed my relationship with jam. I used to buy whatever was cheapest at the grocery store, but now I can’t go back to that artificial-tasting, high-fructose corn syrup nonsense. Once you’ve had real chia jam, there’s no going back.
They’ve also made me feel like a proper adult who meal preps and eats healthy snacks instead of just grabbing whatever’s convenient. When I pack one of these for lunch, my coworkers are always jealous of how put-together my food looks.
If you make these peanut butter cherry chia jam cups and don’t immediately start planning your next batch, I don’t know what to tell you. They’re that good. Let me know what variations you try—I’m always looking for new flavor combinations to obsess over.
Happy jamming! (And may your chia seeds always gel properly on the first try.)
Check more high protein desserts : High Protein Desserts for Your Sweet Tooth!
Peanut Butter Cherry Chia Jam Cups
Layered dessert cups featuring homemade cherry chia jam and creamy peanut butter layers. A healthy, make-ahead treat that tastes like gourmet PB&J with beautiful presentation.
Ingredients
- 1 1/2 cups frozen cherries
- 3 tablespoons chia seeds
- 2 tablespoons pure maple syrup (for jam)
- 1 tablespoon fresh lemon juice
- Pinch of salt (for jam)
- 1/2 teaspoon vanilla extract (optional)
- 3/4 cup natural peanut butter
- 1/3 cup full-fat coconut milk
- 2 tablespoons maple syrup (for peanut butter layer)
- 1 teaspoon vanilla extract (for peanut butter layer)
- Pinch of salt (for peanut butter layer)
- 1 tablespoon melted coconut oil
Instructions
-
Step 1Cook frozen cherries in a medium saucepan over medium heat for 5-7 minutes until they break down and release juices.
-
Step 2Mash cherries with fork to desired consistency, then stir in maple syrup, lemon juice, and salt.
-
Step 3Remove from heat and stir in chia seeds. Let sit 10 minutes, stirring every few minutes until mixture gels.
-
Step 4Add vanilla extract and let chia jam cool completely.
-
Step 5Mix peanut butter, coconut milk, maple syrup, vanilla, and salt until smooth.
-
Step 6Drizzle in melted coconut oil while whisking until well incorporated.
-
Step 7Layer cooled chia jam and peanut butter mixture in small jars or glasses.
-
Step 8Refrigerate for at least 2 hours or overnight until set before serving.