

Roasted Butternut Squash in the Oven is one of those things that sounds super easy until you actually try to make it and realize you have no idea what you’re doing. I’ve been making Roasted Butternut Squash in the Oven for like six months now, and I’ve finally figured out how to get it actually caramelized and delicious instead of mushy and sad. This recipe is what actually works, not what Pinterest says works.
Here’s the thing about Roasted Butternut Squash in the Oven – it’s all about the technique. Too low temp and it steams instead of roasts. Too crowded on the pan and it gets soggy. Wrong size pieces and half are burnt while half are raw. I’ve made every mistake possible with Roasted Butternut Squash in the Oven so you don’t have to.
My first attempt at making Roasted Butternut Squash in the Oven was last fall when I thought I’d be fancy and seasonal. Cut the pieces too big, didn’t use enough oil, and ended up with half-cooked squash that was crunchy in the middle. My boyfriend took one bite and very politely asked if we had any pizza. Fair.
Real Talk About Butternut Squash (The Annoying Truths)
Okay, so nobody tells you that butternut squash is kind of a pain to work with. That skin is TOUGH. Like, I almost took off a finger trying to peel one the first time. Now I know the tricks for making Roasted Butternut Squash in the Oven without losing a limb.
Also, those perfect cubes you see in photos? They’re lies. Your Roasted Butternut Squash in the Oven pieces don’t need to be perfect. Just roughly the same size so they cook evenly. I wasted so much time trying to make magazine-perfect cubes before I realized nobody cares.
The first time I made Roasted Butternut Squash in the Oven, I bought a whole squash and spent like 30 minutes peeling and cutting it while questioning all my life choices. Then I discovered you can buy pre-cut squash. Life changing. Yes, it costs more. No, I don’t care. My time is worth something.
What You Actually Need for Roasted Butternut Squash in the Oven

Here’s what you need for perfect Roasted Butternut Squash in the Oven:
The Main Event:
- 1 medium butternut squash (about 2-3 pounds)
- OR 2 bags pre-cut butternut squash (I’m not judging)
The Basics:
- 2-3 tablespoons olive oil (don’t be stingy)
- 1 teaspoon salt
- 1/2 teaspoon black pepper
- 1/2 teaspoon garlic powder (optional but recommended)
Optional Flavor Additions:
- 1 tablespoon maple syrup (makes it caramelized and amazing)
- 1 teaspoon cinnamon (for sweet version)
- Red pepper flakes (for spicy version)
- Fresh thyme or rosemary
- Balsamic vinegar (drizzle after roasting)
- Parmesan cheese (add in last 5 minutes)
The olive oil is CRUCIAL for good Roasted Butternut Squash in the Oven. Don’t try to use cooking spray or go too light. The oil is what makes it caramelize. I learned this after making dry, sad squash multiple times.
How to Actually Cut the Squash (Without Injury)
This is the hardest part of making Roasted Butternut Squash in the Oven, so pay attention:
If You’re Using a Whole Squash:
Step 1: Microwave the whole squash for 2-3 minutes. This softens the skin slightly and makes cutting easier. Game changer for Roasted Butternut Squash in the Oven prep.
Step 2: Cut off both ends with a sharp knife. Like, REALLY sharp. Dull knives are dangerous.
Step 3: Stand the squash up on one flat end. Carefully slice down to cut it in half lengthwise.
Step 4: Scoop out the seeds with a spoon. (Save them if you want to roast them separately, or just throw them away like I do because I’m lazy.)
Step 5: Cut each half into slices, then peel the skin off each slice. Way easier than trying to peel the whole thing.
Step 6: Cut the peeled slices into 1-inch cubes. Roughly. They don’t need to be perfect for this Roasted Butternut Squash in the Oven.
If You’re Using Pre-Cut:
Open the bag. That’s it. This is my preferred method for Roasted Butternut Squash in the Oven because I value my fingers and my time.
The Actual Roasting Process (This is Important)
Okay, here’s how to make perfect Roasted Butternut Squash in the Oven:
Step 1: Preheat your oven
Set it to 425°F. Not 400°F. Not 450°F. 425°F is the magic number for Roasted Butternut Squash in the Oven. Lower and it steams. Higher and it burns before the inside cooks.
Line a large baking sheet with parchment paper. Do NOT skip this. I’ve scraped too much stuck squash off baking sheets to ever skip this step again for Roasted Butternut Squash in the Oven.
Step 2: Prep the squash
Put your squash cubes in a large bowl. Drizzle with olive oil. Add salt, pepper, and any other seasonings you’re using for your Roasted Butternut Squash in the Oven.
Toss everything together with your hands. Yes, your hands. Using a spoon doesn’t coat evenly. Get in there. Make sure every piece is coated with oil. This is what makes good Roasted Butternut Squash in the Oven.
Step 3: Arrange on the pan
Spread the squash in a SINGLE LAYER on your baking sheet. This is crucial for Roasted Butternut Squash in the Oven. Don’t crowd them. They need space to roast, not steam.
If you overcrowd, the squash releases moisture and just sits in it getting soggy instead of caramelizing. I learned this the hard way. Use two pans if you need to for proper Roasted Butternut Squash in the Oven.
Make sure the flat sides are touching the pan. The parts touching the pan get the best caramelization for your Roasted Butternut Squash in the Oven.
Step 4: Roast
Put the pan in the oven. Set a timer for 15 minutes.
After 15 minutes, take out the pan and flip all the pieces with a spatula. This ensures even browning on your Roasted Butternut Squash in the Oven.
Roast for another 15-20 minutes until the squash is tender when poked with a fork and has nice golden-brown caramelized edges. Total time is 30-35 minutes for perfect Roasted Butternut Squash in the Oven.
Step 5: The finish
Take it out when it’s done. The edges should be browned and slightly crispy. The inside should be tender but not mushy. That’s perfect Roasted Butternut Squash in the Oven.
If you’re adding maple syrup or balsamic vinegar, drizzle it on now and toss. If you’re adding cheese, sprinkle it on and put the pan back in the oven for 2-3 minutes until melted.
What I’ve Learned Through Many Attempts
Actually, you know what? The size of your cubes really matters for Roasted Butternut Squash in the Oven. Too small and they burn. Too big and the outside is done but the inside is still hard. Aim for 1-inch cubes. I use my thumb as a measuring guide because I’m not getting out a ruler for vegetables.
Oh, and another thing – don’t stir them too much. Once at the halfway point is enough for this Roasted Butternut Squash in the Oven. Every time you open the oven, the temperature drops and it takes longer to cook.
The parchment paper isn’t just for easy cleanup (though that’s nice). It also helps the squash not stick, which means you can get it off the pan with those beautiful caramelized edges intact. Important for good Roasted Butternut Squash in the Oven.
If your oven runs hot or cold, you might need to adjust the time. My old apartment oven was terrible and I had to add 10 minutes to every recipe. Know your oven when making this Roasted Butternut Squash in the Oven.
Don’t add the maple syrup before roasting. It’ll burn. Add it after. Trust me on this one. I made burnt maple squash once and my kitchen smelled weird for days. Not the goal with Roasted Butternut Squash in the Oven.
Last Tuesday I was running late and tried to roast the squash at 475°F to “speed it up.” The outside burnt and the inside stayed raw. Don’t try to rush Roasted Butternut Squash in the Oven. Just let it do its thing at the right temperature.
Different Ways to Flavor Your Roasted Butternut Squash in the Oven
Sweet Version: After roasting, drizzle with maple syrup and sprinkle with cinnamon. Add some toasted pecans if you’re feeling fancy. This Roasted Butternut Squash in the Oven version is perfect for Thanksgiving.
Savory Version: Roast with garlic powder, thyme, and rosemary. Drizzle with balsamic vinegar after cooking. This is my go-to weeknight Roasted Butternut Squash in the Oven.
Spicy Version: Add red pepper flakes and smoked paprika before roasting. Squeeze lime juice over it when done. Makes boring Roasted Butternut Squash in the Oven actually exciting.
Cheesy Version: In the last 5 minutes, sprinkle with Parmesan or feta. Let it get melty and delicious. Ultimate comfort food Roasted Butternut Squash in the Oven.
What to Actually Do With It
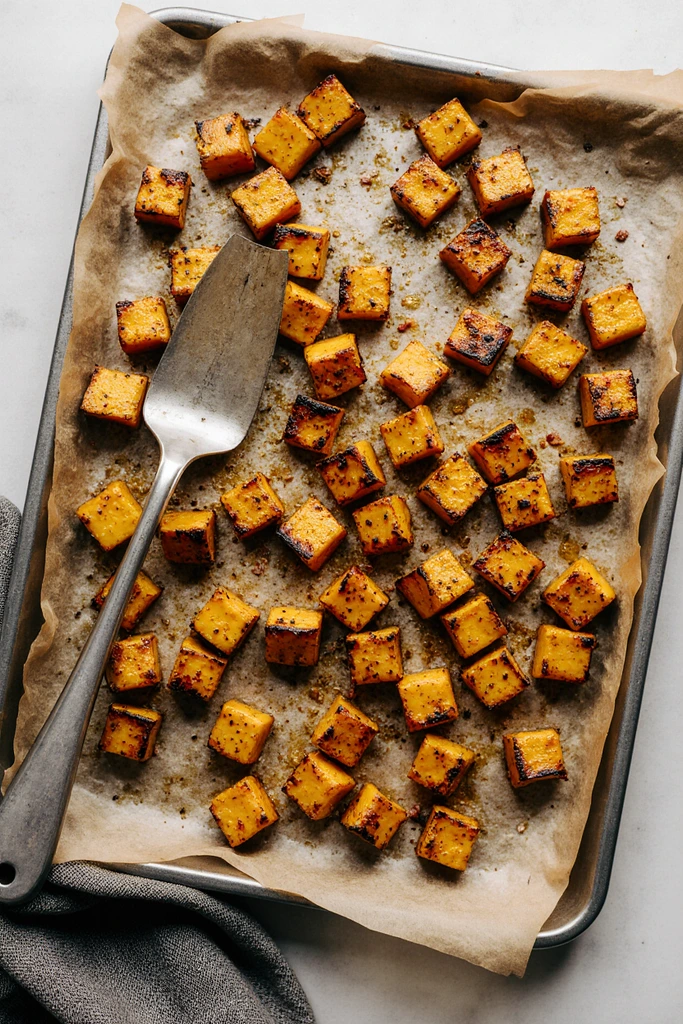
Okay, so you’ve made perfect Roasted Butternut Squash in the Oven. Now what?
- Eat it as a side dish (duh)
- Toss it with pasta and sage butter
- Add it to salads (the warm squash on cold greens is chef’s kiss)
- Blend it into soup
- Put it in grain bowls
- Add it to tacos (weird but good)
- Mash it like mashed potatoes
- Put it on pizza (trust me)
I usually make a huge batch of this Roasted Butternut Squash in the Oven on Sunday and use it throughout the week. It reheats pretty well in the microwave, or you can eat it cold in salads.
Storage and Reheating
Your Roasted Butternut Squash in the Oven will last about 4-5 days in the fridge in an airtight container. It won’t be quite as crispy when reheated, but it’s still good.
To reheat: I pop it in a 400°F oven for like 5-10 minutes to crisp it up again. Microwave works too if you don’t care about crispiness. This makes meal prepping Roasted Butternut Squash in the Oven actually practical.
You can also freeze it for up to 3 months. It gets a little mushy when thawed, but it’s fine for adding to soups or mashing. Not ideal for eating as-is, but still useful for prepped Roasted Butternut Squash in the Oven.
Honest Assessment
Look, Roasted Butternut Squash in the Oven is not the most exciting food in the world. But when you make it right – caramelized edges, tender inside, good seasoning – it’s actually really good. Sweet, savory, versatile, and somehow feels like fall in vegetable form.
Is it worth the effort of cutting a whole squash? Debatable. Is it worth buying pre-cut and roasting it? Absolutely. This Roasted Butternut Squash in the Oven is one of those things that makes you feel like you have your life together even if you don’t.
My mom was impressed when I served her this Roasted Butternut Squash in the Oven at dinner. She asked for the recipe like I’d done something complicated. I just roasted vegetables. But she doesn’t need to know it’s this easy.
Have you made roasted butternut squash before? Let me know in the comments if you have any tricks I’m missing because I’m always learning new ways to make this Roasted Butternut Squash in the Oven even better.
Anyway, give this a try next time you see butternut squash at the store. Or more realistically, next time you see the pre-cut kind and don’t feel like cooking anything complicated but want something better than frozen pizza.
Now I want roasted squash and it’s summer and they’re not in season. Guess I’ll have to wait for fall to make more Roasted Butternut Squash in the Oven.
Happy roasting! (and may your knife skills stay intact) 🎃🔥
Table of Contents
Roasted Butternut Squash in the Oven
Perfect Roasted Butternut Squash in the Oven with caramelized edges and tender insides. This tested recipe includes cutting tips, ideal roasting temperature and timing, plus sweet and savory flavor variations for delicious results every time.
Ingredients
- 1 medium butternut squash (2-3 pounds), peeled and cubed into 1-inch pieces
- 2-3 tablespoons olive oil
- 1 teaspoon salt
- 1/2 teaspoon black pepper
- 1/2 teaspoon garlic powder (optional)
- 1 tablespoon maple syrup (optional, for sweet version)
- Fresh thyme or rosemary (optional)
- Red pepper flakes (optional, for spicy version)
- Parmesan cheese (optional, for cheesy version)
Instructions
-
Step 1Preheat oven to 425°F (220°C). Line a large baking sheet with parchment paper.
-
Step 2If using whole squash: Microwave for 2-3 minutes to soften slightly. Cut off both ends, slice in half lengthwise, scoop out seeds, cut into slices, peel each slice, then cube into 1-inch pieces. Or use pre-cut squash to save time.
-
Step 3Place butternut squash cubes in a large bowl. Drizzle with olive oil and add salt, pepper, and garlic powder if using.
-
Step 4Toss with your hands to ensure every piece is evenly coated with oil and seasonings.
-
Step 5Spread squash in a single layer on the prepared baking sheet, making sure pieces aren't crowded. Arrange with flat sides down for best caramelization. Use two pans if necessary.
-
Step 6Roast for 15 minutes.
-
Step 7Remove from oven and flip all pieces with a spatula.
-
Step 8Return to oven and roast for an additional 15-20 minutes until squash is tender when pierced with a fork and edges are golden brown and caramelized.
-
Step 9For sweet version: Drizzle with maple syrup and sprinkle with cinnamon after roasting. For savory: drizzle with balsamic vinegar. For cheesy: sprinkle with Parmesan in the last 5 minutes of cooking.
-
Step 10Serve hot as a side dish or use in salads, pasta, grain bowls, or soups. Store leftovers in an airtight container in the refrigerator for up to 5 days.