

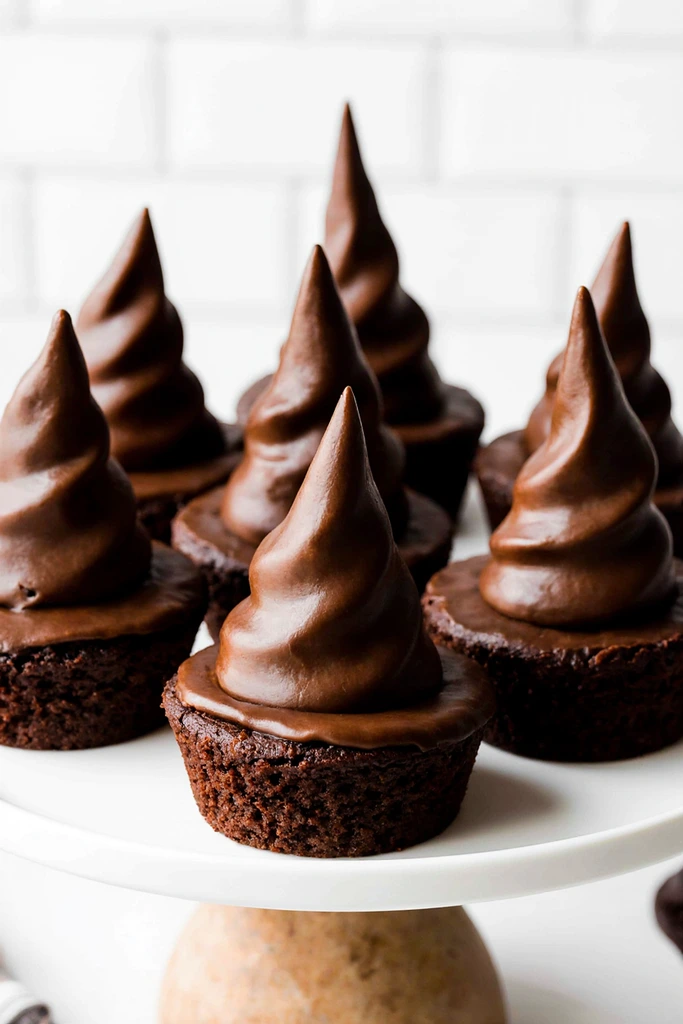
Witch Hat Brownies are honestly the most fun Halloween treat I’ve ever made, and trust me, I’ve tried everything from spider cupcakes to graveyard dirt cake. But here’s the thing—I messed these up spectacularly the first time. Like, complete disaster level mess-up.
It was two weeks before Halloween last year, and I was frantically trying to come up with something cute for my daughter’s class party. Pinterest had me convinced these Witch Hat Brownies would be super easy. Wrong. So very wrong. The ice cream cones kept sliding off, the frosting was too thin, and honestly, they looked more like collapsed traffic cones than magical witch hats. My 8-year-old took one look and said, “Mom, these are… interesting.” Ouch.
But you know what? I’m stubborn. And after three attempts (and way too much chocolate consumed during “quality testing”), I finally cracked the code for perfect Witch Hat Brownies that actually look magical and taste incredible.
The Backstory (And My Epic Failures)
Look, I’m gonna be honest with you—these Witch Hat Brownies aren’t some family recipe passed down through generations. I think I first saw them on Instagram, or maybe it was TikTok? Social media all blurs together when you’re scrolling at midnight looking for Halloween inspiration.
The concept seemed simple enough: bake brownies, add some frosting, stick an ice cream cone on top. Boom. Witch hat. Except nobody mentioned that sugar cones are basically impossible to keep upright on fudgy brownies, or that regular buttercream frosting has zero structural integrity when it comes to cone engineering.
Version 1.0 was, as my neighbor Sarah put it, “abstract art.” Version 2.0 looked better but tasted like sugary cardboard because I’d overbaked everything trying to make it sturdy enough. But Version 3.0? That’s when the magic happened, literally and figuratively.
Actually, you know what helped me figure this out? My mom always said that the best recipes come from happy accidents. And boy, did I have accidents. The breakthrough came when I accidentally used cream cheese frosting instead of regular buttercream (grabbed the wrong container from my fridge), and suddenly everything made sense. The tang balanced the sweetness, and it was thick enough to actually hold those darn cones in place.
Why These Witch Hat Brownies Work (Finally)
So here’s what makes these special—and different from all those other recipes floating around online. First, we’re using a slightly underbaked brownie base. I know, I know, sounds weird. But trust me on this one. The gooey texture actually helps anchor the cones better than a fully set brownie.
Second, and this is crucial—we’re using waffle cones, not sugar cones. Sugar cones are too heavy and have that flat bottom that just slides around. Waffle cones are lighter, have more texture for the frosting to grip, and honestly taste way better. Plus they look more hat-like with their pointed shape.
The frosting situation was my biggest learning curve with these Witch Hat Brownies. Regular buttercream is too soft, royal icing is too hard, but cream cheese frosting? It’s like the Goldilocks of frostings—just right. It’s thick enough to support the cone but still pipes beautifully for decorating.
Oh, and here’s a random tip I discovered by accident—if you chill the brownies for about 30 minutes before assembling, the Witch Hat Brownies hold together so much better. Learned this when I got distracted by a phone call and forgot about them in the fridge. Sometimes procrastination pays off!
Shopping for These Witch Hat Brownies (The Real Talk)
Alright, let’s talk ingredients. You’re gonna need brownie ingredients (obviously), cream cheese, butter, powdered sugar, and waffle cones. Sounds simple, but let me save you some grocery store drama.
For the brownies, I’ve tried homemade and box mix. Look, I’m not gonna lie—for these Witch Hat Brownies, box mix actually works better. The texture is more consistent, and you’re not gonna taste the difference once everything’s assembled. I usually grab Duncan Hines or Betty Crocker, whatever’s on sale.
The waffle cones are where things get tricky. Don’t buy those tiny cocktail-sized ones or the giant waffle bowls. You want medium-sized pointed waffle cones. I found mine at Target in the ice cream aisle. Pro tip: buy extra because I somehow managed to break three while trying to get them out of the box. These things are more fragile than my patience during rush hour traffic.
For the cream cheese, get the block kind, not the spreadable stuff in a tub. Trust me, I tried the tub version once thinking it would save time. It didn’t hold the right consistency for proper Witch Hat Brownies assembly.
And here’s something nobody tells you—you’re gonna want black food coloring for the witchy effect, but most stores only carry those tiny bottles that cost like five bucks each. Hit up a baking supply store if you have one nearby, or just order gel food coloring online. Way cheaper and you’ll actually have enough to make these look properly spooky.
Making Perfect Witch Hat Brownies (Step by Step)
Step 1: Bake the Brownies (But Not Too Much)
Preheat your oven to whatever the box says minus 10 degrees. So if it says 350°F, go with 340°F. Mix up your brownie batter according to package directions—nothing fancy here. Pour it into a greased 9×13 pan and bake for about 5 minutes LESS than the box recommends.
Here’s the key for perfect Witch Hat Brownies: they should still look slightly underdone in the center when you pull them out. Like, the toothpick should come out with a few moist crumbs. I know it goes against everything we’ve been taught about baking, but trust the process.
Let them cool completely. And I mean completely. Room temperature, not “eh, they seem cool enough.” This is where I messed up the first time—tried to frost warm brownies and ended up with chocolate soup.
Step 2: The Magic Frosting
This frosting is what makes these Witch Hat Brownies actually work instead of being a Pinterest fail. Beat together 8 oz softened cream cheese, 1/2 cup softened butter, 3 cups powdered sugar, and 1 teaspoon vanilla. Beat it until it’s fluffy and thick—like, thick enough that you could probably use it as spackling compound.
Now here’s where the fun starts. Divide the frosting in half. Leave one half white (or add a tiny bit of orange food coloring for fall vibes), and color the other half with black gel food coloring. Fair warning: it takes more black coloring than you think to get a good witchy black. Start with a little and keep adding until it looks properly spooky.
The consistency should be thick enough that when you lift the beaters, it holds its shape for a few seconds before settling. If it’s too thin, add more powdered sugar. Too thick? Add a tablespoon of milk. You want it perfect for these Witch Hat Brownies to look professional.
Step 3: Assembly Time (Where the Magic Happens)
Cut your cooled brownies into squares. I usually get about 12 pieces from a 9×13 pan, but honestly, size doesn’t matter as much as you’d think for Witch Hat Brownies. Some people like big squares, some prefer smaller bites.
Here’s my assembly technique that actually works: Put about a tablespoon of the darker frosting in the center of each brownie square. Don’t spread it—just plop it there like a little mountain. This creates a base for your cone to sink into.
Gently press a waffle cone point-down into that frosting mountain. It should sink in about halfway. Don’t push too hard or you’ll crack the brownie (been there, cried about it). The cone should stand upright on its own. If it doesn’t, add more frosting to the base.
Now pipe the remaining frosting around the base of each cone using whatever piping tip you have. I like star tips for texture, but honestly, a ziplock bag with the corner cut off works fine for these Witch Hat Brownies. The goal is to cover where the cone meets the brownie and make it look like the brim of a witch hat.
Step 4: The Finishing Touches
This is where you can get creative with your Witch Hat Brownies. I like to add little candy decorations—maybe some orange sprinkles or tiny candy stars. Sometimes I’ll pipe a band around the cone with contrasting frosting to look like a hatband.
One year I got fancy and added little fondant buckles, but honestly? My kids preferred them plain. Less is more sometimes, even with magical Witch Hat Brownies.
What I’ve Learned Making These (The Hard Way)
After making approximately a million batches of these Witch Hat Brownies (okay, maybe like six batches, but it felt like a million), here’s what I wish someone had told me:
The brownies actually taste better the next day. Something about the flavors settling together overnight makes them extra fudgy and delicious. So if you’re making these Witch Hat Brownies for a party, don’t stress about last-minute assembly.
Storage is weird with these. You can’t just stack them in a container because of the cones. I use a big flat container and arrange them carefully, or sometimes I just leave them on a covered cake plate. They’ll keep for about three days, but good luck having them last that long.
Temperature matters more than I expected. These Witch Hat Brownies are best served at room temperature. Too cold and the brownie gets hard, too warm and the frosting gets melty. Room temp is the sweet spot where everything comes together perfectly.
Oh, and here’s something random I discovered—kids absolutely lose their minds over these. My daughter’s friends still ask about “those witch hat things” months later. Adults love them too, but kids act like you’ve literally performed magic when you pull out a tray of properly made Witch Hat Brownies.
Troubleshooting Your Witch Hat Brownies
Because let’s be real, these don’t always go perfectly the first time:
Cones keep falling over? Your frosting is probably too thin, or your brownies are too warm. Chill everything for 15 minutes and try again with thicker frosting.
Brownies are too crumbly? You might have overbaked them. Next time, pull them out when they still look slightly underdone. For this batch, try chilling them before assembly—sometimes that helps hold things together.
Frosting looks weird? Cream cheese frosting can be finicky. If it’s too thin, add more powdered sugar gradually. If it looks curdled, your ingredients weren’t at room temperature. Try beating it longer or add a tablespoon of hot milk to smooth it out.
Cones taste stale? Yeah, waffle cones don’t last forever. Buy them fresh, and if you’re making these Witch Hat Brownies ahead of time, add the cones at the last minute possible.
The Final Verdict
Look, these aren’t the fanciest dessert I’ve ever made, and they definitely don’t photograph as well as those perfect Pinterest versions (seriously, how do food bloggers get such good lighting?). But you know what? They taste amazing, they’re fun to make, and people absolutely love them.
Every Halloween now, I get requests for these Witch Hat Brownies. My neighbor Sarah has started making them for her book club. My sister-in-law asked for the recipe three times because she kept forgetting to write it down (hence why I’m finally typing this all out).
They’re sweet without being overwhelming, chocolatey without being too rich, and just magical enough to make any Halloween celebration a little more special. Plus, making them with kids is actually fun instead of stressful—they can help with the decorating part without too much risk of kitchen disasters.
Anyway, if you make these Witch Hat Brownies, definitely let me know how they turn out! And if you figure out any improvements or shortcuts, I’m all ears. There’s always room for magic in the kitchen.
Happy Halloween, and may your Witch Hat Brownies stand tall and proud! 🧙♀️🍫
Table of Contents
Witch Hat Brownies
Perfect Witch Hat Brownies with fudgy chocolate brownies topped with waffle cone hats and cream cheese frosting. A magical Halloween treat that's fun to make and even better to eat. Includes tips for perfect assembly and troubleshooting.
Ingredients
- 1 box brownie mix (plus ingredients called for on box: eggs, oil, water)
- 8 oz cream cheese, softened
- 1/2 cup unsalted butter, softened
- 3 cups powdered sugar
- 1 teaspoon vanilla extract
- Black gel food coloring
- 12 medium waffle cones
- Orange sprinkles or candy decorations (optional)
Instructions
-
Step 1Preheat oven to 10 degrees less than brownie box instructions (usually 340°F). Prepare brownie mix according to package directions.
-
Step 2Pour brownie batter into greased 9x13 pan and bake for 5 minutes less than package directions, until center is still slightly underdone.
-
Step 3Cool brownies completely to room temperature before assembly.
-
Step 4Beat together softened cream cheese, butter, powdered sugar, and vanilla until thick and fluffy.
-
Step 5Divide frosting in half. Color one half with black gel food coloring until desired darkness is reached.
-
Step 6Cut cooled brownies into 12 squares. Place a tablespoon of darker frosting in center of each square.
-
Step 7Gently press waffle cone point-down into frosting mountain until cone stands upright on its own.
-
Step 8Pipe remaining frosting around base of each cone to create witch hat brim effect.
-
Step 9Add optional decorations like sprinkles or candy details to complete the magical look.
-
Step 10Serve at room temperature for best texture and flavor.