
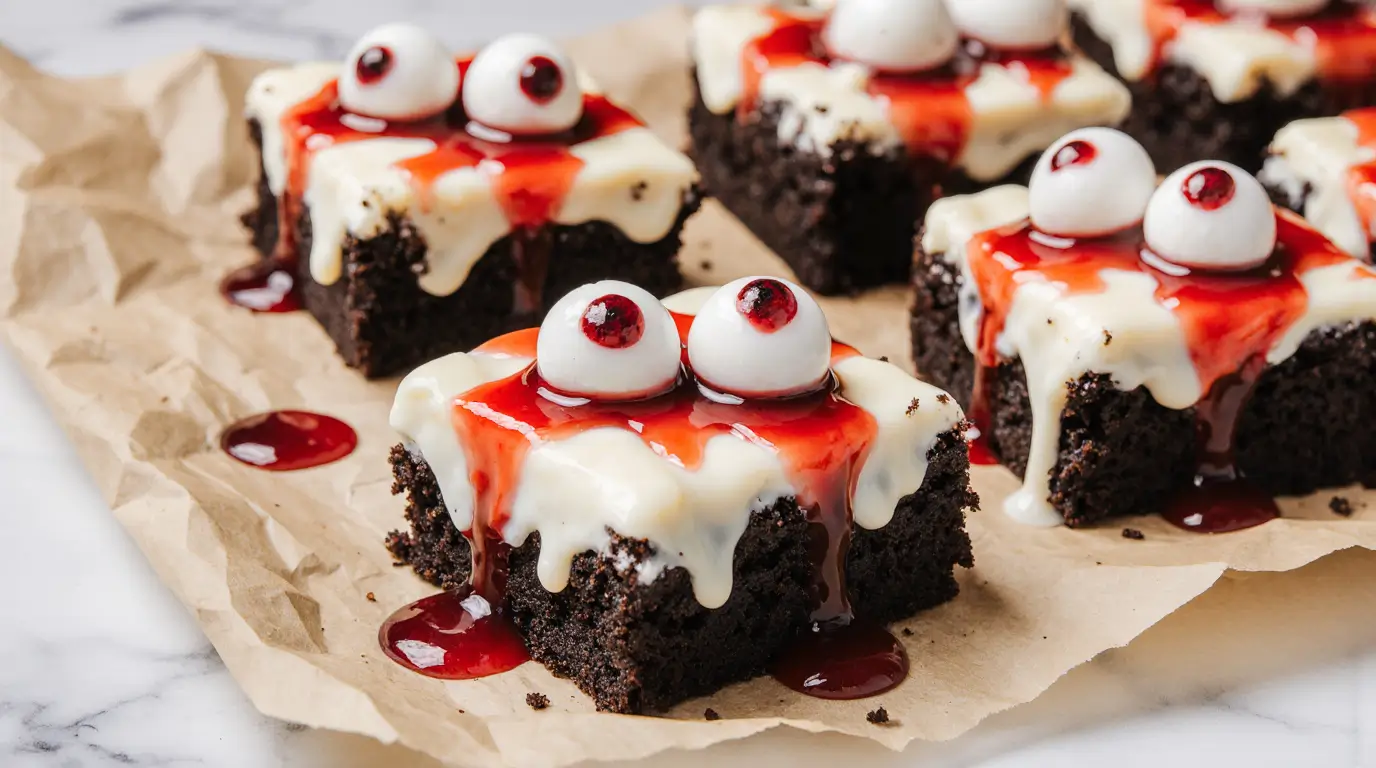
Halloween eyeball brownies are hands down the most fun—and slightly disturbing—thing I make every October, and trust me, they’re easier than you think. Look, I’ll be real with you: Halloween eyeball brownies started as a Pinterest fail for me. Year one? Looked like sad blobs with white dots. Year two? Better, but still looked more like polka-dotted brownies than actual eyeballs. But this year? These Halloween eyeball brownies are so realistic they actually creep me out a little.
My neighbor’s kid took one look at them last weekend and said, “Eww, but can I have three?” That’s basically the highest compliment you can get for Halloween eyeball brownies, right? The perfect combo of gross and delicious.
Now, here’s the thing about Halloween eyeball brownies—they’re basically just really good brownies with some creative decorating. But the decorating part? That’s where the magic happens. And also where things can go hilariously wrong if you’re not paying attention.
Table of Contents
Why These Halloween Eyeball Brownies Are Actually Perfect
Everyone tries to make Halloween eyeball brownies, but most recipes online are either way too complicated or they just don’t look right. These? They look properly creepy without requiring a degree in food art. Plus they taste like the best fudgy brownies you’ve ever had, which is honestly the most important part.
I’ve probably made Halloween eyeball brownies fifteen different ways over the years. Tried white chocolate chips (looked weird), mini marshmallows (disaster), and even those candy eyeballs from the store (too expensive and they tasted like plastic). This method using mini vanilla wafers and decorating gel? Game changer.
Actually, funny story—I discovered the vanilla wafer trick completely by accident. Was making regular brownies for my book club, grabbed what I thought were chocolate chips from the pantry, and they turned out to be crushed vanilla wafers my daughter had been snacking on. The texture was incredible, so I started experimenting with whole ones for Halloween brownies. Sometimes the best discoveries happen when you’re not even trying.
The Secret Ingredients for Perfect Halloween Eyeball Brownies

Okay, so after years of Halloween eyeball brownies experimentation, here’s what actually works. The brownie base is my go-to fudgy recipe (none of that cake-y brownie nonsense), and the eyeball decorations are simple but effective.
For the brownies:
- 1 cup unsalted butter
- 2 cups granulated sugar
- 4 large eggs
- ¾ cup unsweetened cocoa powder
- 1 cup all-purpose flour
- ½ teaspoon salt
- 1 teaspoon vanilla extract
- ½ cup chocolate chips (because why not?)
For the eyeball decoration:
- 24 mini vanilla wafers (Nilla Wafers work perfectly)
- 1 tube white decorating gel
- 1 tube red decorating gel
- 1 tube green or blue decorating gel (for the iris)
- Black decorating gel or mini chocolate chips for pupils
I always use real butter for these Halloween brownies, not margarine. Life’s too short for margarine brownies, and Halloween only comes once a year. The cocoa powder makes a huge difference too—I use Hershey’s Special Dark because it gives these Halloween brownies that deep, fudgy color that makes the eyeballs pop.
Making the Brownie Base (The Foundation of Great Halloween Eyeball Brownies)
First things first—preheat your oven to 350°F and line a 9×13 pan with parchment paper. I learned this trick the hard way: always use parchment paper for Halloween eyeball brownies. Regular greasing works fine, but when you’re decorating, you want clean edges and easy removal.
Melt the butter in a large saucepan over medium heat. Don’t rush this part—burnt butter will ruin your Halloween eyeball brownies faster than you can say “trick or treat.” Once it’s melted, remove from heat and stir in the sugar until combined.
Add the eggs one at a time. This is important! I used to just dump all four eggs in at once and wonder why my Halloween brownies turned out weird. One at a time creates that perfect fudgy texture we’re going for.
In a separate bowl, whisk together cocoa powder, flour, and salt. I know, I know—more dishes. But trust me, this prevents lumpy Halloween eyeball brownies. Nobody wants to bite into a chocolate chip and hit a pocket of flour.
Fold the dry ingredients into the wet mixture until just combined, then stir in vanilla and chocolate chips. The batter should be thick and glossy—if it looks thin, something went wrong.
The Baking Process (Don’t Overthink It)
Pour the batter into your prepared pan and spread it evenly. I use an offset spatula for this because I’m fancy like that, but the back of a spoon works too. Bake for 25-30 minutes, but here’s the key: don’t overbake. These Halloween eyeball brownies should still look slightly underdone in the center when you pull them out.
The toothpick test? Forget it. For fudgy Halloween eyeball brownies, you want a few moist crumbs on that toothpick. They’ll finish cooking in the residual heat while they cool, and you’ll end up with that perfect chewy texture.
Let them cool completely in the pan. I repeat: COMPLETELY. I know it’s torture, especially when they smell so good, but warm brownies and decorating gel don’t mix. Trust me, I learned this lesson the messy way.
Creating the Eyeballs (Where Things Get Fun and Slightly Gross)
Once your Halloween eyeball brownies are completely cool, cut them into squares. I usually get about 24 pieces from a 9×13 pan, which is perfect because that’s exactly how many mini vanilla wafers I buy.
Now comes the fun part—making these Halloween eyeball brownies actually look like eyeballs. Place one mini vanilla wafer on each brownie square. Press it down just slightly so it stays put but don’t smoosh it into the brownie.
Here’s where my technique differs from other Halloween eyeball brownies recipes: I use the white decorating gel to create “bloodshot” lines radiating out from the vanilla wafer. Start at the edge of the wafer and draw squiggly lines toward the edges of the brownie. This makes them look properly creepy.
Next, add a small dot of colored gel (blue, green, or brown) in the center of each vanilla wafer for the iris. Then add an even smaller dot of black gel or a mini chocolate chip for the pupil. The key is making each eye slightly different—real eyes aren’t perfectly symmetrical, and neither should your Halloween eyeball brownies be.
The Final Creepy Touch
This is where these Halloween eyeball brownies go from “cute Halloween treat” to “legitimately creepy dessert.” Use the red decorating gel to add “blood vessels” around the white part of the eye and maybe some “blood” dripping down the brownie. Don’t go overboard—a little red goes a long way.
I like to make some eyes look sleepy (add gel “eyelids” at the top), some look surprised (make the pupils really big), and some look angry (draw the gel to make the eye look like it’s squinting). It’s like giving each Halloween eyeball brownie its own personality, which sounds weird when I write it out but is actually really fun.
Storage and Serving Your Halloween Eyeball Brownies
These Halloween eyeball brownies keep for about a week covered at room temperature, but let’s be honest—they never last that long. The decorating gel stays pretty stable, though it might bleed slightly into the brownie if it’s really humid.
I usually make these Halloween eyeball brownies the day before whatever Halloween party I’m attending. They actually look better after sitting overnight because the gel sets up and the “blood vessels” look more realistic.
Pro tip: take photos of your Halloween eyeball brownies before people start eating them. They photograph really well, and you’ll want to remember which eyeball designs worked best for next year.
Why Kids (And Adults) Love These Halloween Eyeball Brownies
My teenage daughter, who normally acts too cool for my baking projects, actually helped me decorate the last batch of Halloween eyeball brownies. She made hers look like they were crying (using blue gel for tears) and posted them on her Instagram. Apparently they got like 200 likes, so I guess these Halloween eyeball brownies are officially teen-approved.
The best part about Halloween eyeball brownies is watching people’s faces when they first see them. There’s always this moment of “eww” followed immediately by “ooh, can I try one?” They’re the perfect balance of creepy and delicious.
Final Thoughts on These Halloween Eyeball Brownies

After years of making various Halloween treats, these Halloween eyeball brownies are still my favorite. They’re impressive enough to win any Halloween party, but easy enough that you won’t stress yourself out making them. Plus, unlike some Halloween treats that are all show and no substance, these actually taste incredible.
Make them for your next Halloween gathering and watch people’s reactions. These Halloween eyeball brownies are guaranteed conversation starters, and honestly, isn’t that what Halloween is all about?
Happy haunting, and may all your Halloween eyeball brownies be perfectly creepy! 👁️🎃
Also check this Easy Halloween Graveyard Brownies That’ll Actually Impress People
Halloween Eyeball Brownies
Spooky Halloween eyeball brownies featuring fudgy chocolate brownies topped with realistic-looking vanilla wafer eyeballs decorated with colorful gel. These creepy treats are perfect for Halloween parties and guaranteed to impress both kids and adults.
Ingredients
- 1 cup unsalted butter
- 2 cups granulated sugar
- 4 large eggs
- ¾ cup unsweetened cocoa powder
- 1 cup all-purpose flour
- ½ teaspoon salt
- 1 teaspoon vanilla extract
- ½ cup chocolate chips
- 24 mini vanilla wafers
- 1 tube white decorating gel
- 1 tube red decorating gel
- 1 tube green or blue decorating gel
- 1 tube black decorating gel or mini chocolate chips
Instructions
-
Step 1Preheat oven to 350°F (175°C). Line a 9x13 inch baking pan with parchment paper.
-
Step 2Melt butter in a large saucepan over medium heat. Remove from heat and stir in sugar until combined.
-
Step 3Add eggs one at a time, beating well after each addition.
-
Step 4In a separate bowl, whisk together cocoa powder, flour, and salt.
-
Step 5Fold dry ingredients into wet mixture until just combined. Stir in vanilla and chocolate chips.
-
Step 6Pour batter into prepared pan and spread evenly. Bake for 25-30 minutes until slightly underdone in center.
-
Step 7Cool completely in pan before cutting into 24 squares.
-
Step 8Place one mini vanilla wafer on each brownie square, pressing lightly to adhere.
-
Step 9Use white decorating gel to draw bloodshot lines from wafer edges toward brownie edges.
-
Step 10Add colored gel dot in center of each wafer for iris, then black gel or mini chocolate chip for pupil.
-
Step 11Use red gel to add blood vessels around eyes and dripping blood effects for extra creepiness.