

Halloween ghost toasts became my October obsession after my 6-year-old nephew declared regular toast “boring” during last year’s Halloween breakfast. Look, I’m gonna be honest—I tried making these three times before they stopped looking like sad, melted blobs on bread. But now? Now I’ve got it down to a science, and these Halloween ghost toasts are the cutest things you’ll put in your mouth.
The whole ghost toasts idea started because I was desperately trying to make October mornings more fun without spending a fortune on fancy breakfast ingredients. I mean, who has time for elaborate Halloween breakfast spreads when you’re already stressed about costume shopping and candy buying? These ghost toasts use stuff you probably already have, and honestly, they’re so simple that even my disaster-prone kitchen skills can handle them.
Now, here’s the thing about making ghost toasts—everyone on Pinterest makes it look so perfect and easy. But reality check: my first attempt looked more like abstract art than ghosts. The cream cheese was too thick, the bread got soggy, and don’t even get me started on trying to make the faces symmetrical. Complete disaster.
But I’m stubborn, so I kept trying different methods for these ghost toasts until I figured out what actually works. Turns out, the secret is in the bread choice and how you spread the “ghost” part. Who knew? Well, apparently everyone except me, because my neighbor Sarah was like, “Oh yeah, I always use brioche for ghost toasts.” Thanks for the heads up, Sarah.
Table of Contents
The Story Behind These Halloween Ghost Toasts
I think the idea for Halloween ghost toasts came to me during one of those 2 AM Pinterest scrolling sessions. You know the ones—where you start looking for easy dinner ideas and somehow end up saving 47 Halloween craft projects you’ll never make? Anyway, I saw these adorable ghost toasts and thought, “How hard could it be?”
Famous last words, right?
My first batch of Halloween ghost toasts was honestly tragic. I used regular white bread (mistake #1), spread the cream cheese with a butter knife like some kind of amateur (mistake #2), and tried to make the ghost faces with chocolate chips that immediately sank into the cream cheese and disappeared (mistake #3). The kids took one look and asked if they were “sick ghosts” because they looked so sad and lumpy.
But you know what? Sometimes the best ghost toasts come from epic failures. Each disaster taught me something new, and now I can make these little guys in my sleep. Well, not literally, because that would be weird and possibly dangerous with a toaster involved.
What You’ll Need for Perfect Halloween Ghost Toasts

Here’s where I learned that ingredients actually matter for Halloween ghost toasts. I know, revolutionary concept. But seriously, using the right stuff makes all the difference between Instagram-worthy ghosts and whatever those first attempts were supposed to be.
For the Halloween ghost toasts base:
- 6-8 slices of brioche or thick white bread (trust me, skip the thin stuff)
- 8 oz cream cheese, softened (and I mean REALLY softened—leave it out for like 2 hours)
- 2 tablespoons powdered sugar
- 1 teaspoon vanilla extract
- Mini chocolate chips or dark chocolate chips for the faces
- Black sesame seeds (optional, but they make perfect tiny eyes)
The bread choice for ghost toasts is crucial. I’ve tried everything from Wonder Bread to sourdough, and brioche wins every single time. It’s thick enough to hold the cream cheese without getting soggy, sweet enough to complement the ghost topping, and sturdy enough that it won’t fall apart when little hands grab it.
Don’t even think about using that pre-whipped cream cheese for these ghost toasts. Been there, done that, got the disappointing results. You want the block kind that you can actually control the consistency of. And please, for the love of all that is holy, let it soften properly. Cold cream cheese will tear your bread to shreds and make you question your life choices.
Making the Ghost Part (The Tricky Bit)
Okay, so the ghost mixture for ghost toasts is where I initially went wrong. I thought I could just slap some cream cheese on bread and call it a day. Nope. These ghost toasts need a proper ghost mixture that’s smooth, spreadable, and actually stays put.
Beat the softened cream cheese until it’s fluffy—like, really go at it for a good 2-3 minutes with an electric mixer. Then add the powdered sugar and vanilla. The powdered sugar isn’t just for sweetness (though these ghost toasts are definitely more dessert than breakfast); it also helps thicken the mixture so it holds its shape better.
Here’s what I discovered about the texture for Halloween ghost toasts: it should be thick enough that when you lift the beater, it holds soft peaks, but not so thick that it’s hard to spread. Think somewhere between frosting and whipped cream. If it’s too thin, your ghosts will look more like melted ice cream. If it’s too thick, you’ll tear the bread trying to spread it.
Pro tip for ghost toasts: make the ghost mixture the night before and let it chill in the fridge. It firms up just enough to be easier to work with, and honestly, it tastes better too. Something about letting those flavors meld together overnight makes these Halloween ghost toasts extra delicious.
The Assembly Process (Where Magic Happens)
Now comes the fun part of making Halloween ghost toasts—actually creating the little ghosts! This is where my 8-year-old nephew becomes my sous chef because apparently, kids are naturally better at making ghost shapes than adults. Who knew?
Toast your bread until it’s golden but not too crispy for the Halloween ghost toasts. You want it firm enough to hold the topping but not so crunchy that it breaks when you bite it. I learned this the hard way when my first batch sounded like eating glass and scared the dog.
For spreading the ghost mixture on Halloween ghost toasts, use an offset spatula if you have one. If not (like me for the first 37 years of my life), a butter knife works fine, but be gentle. Start in the center and work your way out in a ghost-like shape. Don’t worry about making it perfect—real ghosts probably aren’t perfectly symmetrical anyway, right?
The ghost shape for Halloween ghost toasts doesn’t have to be fancy. Think of a basic ghost silhouette: round head, flowing body that gets wider at the bottom, maybe some wavy edges to suggest that ethereal floating thing. I make mine about 4 inches tall and 3 inches wide, but honestly, there’s no ghost police coming to measure your Halloween ghost toasts.
Adding the Faces (The Make-or-Break Moment)
This is where Halloween ghost toasts either become adorable or terrifying. And let me tell you, I’ve made some truly terrifying ones in my learning process. The key is restraint—something I’m not naturally good at, but I’m working on it.
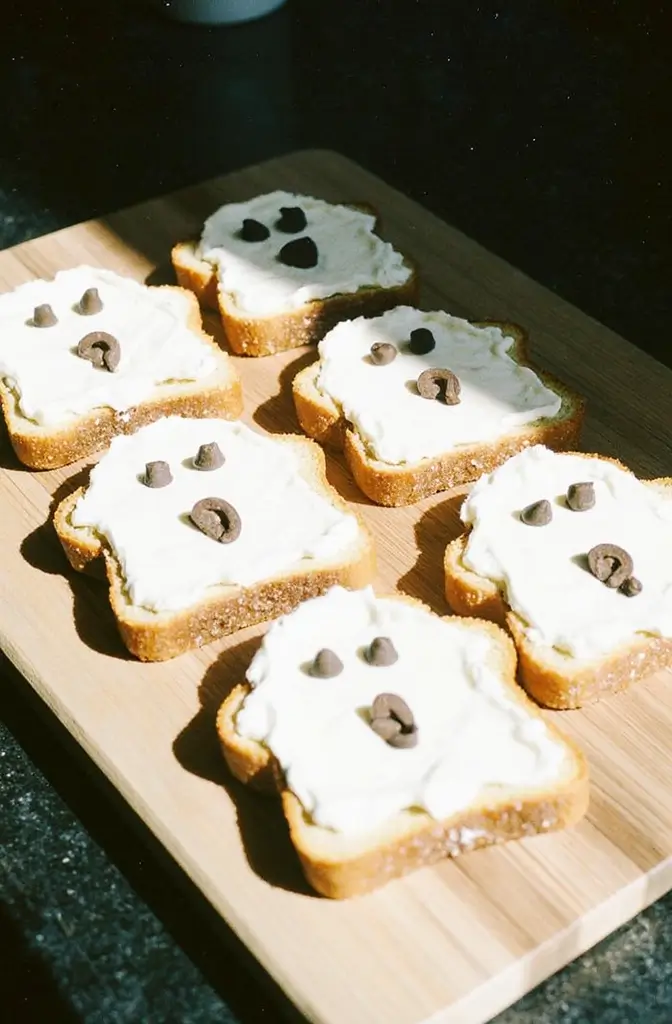
For the eyes on Halloween ghost toasts, I use mini chocolate chips placed pointy-side down. Regular chocolate chips work too, but they’re a bit big and can make your ghosts look more surprised than spooky. Push them just slightly into the cream cheese so they stay put but don’t sink completely.
The mouth is where you can get creative with Halloween ghost toasts. I usually go for a simple “O” shape using one chocolate chip or a tiny curved line using a toothpick dipped in melted chocolate. Some people get fancy with different expressions, but honestly, classic surprised-ghost-face works perfectly for these Halloween ghost toasts.
Distance between features matters more than you’d think for Halloween ghost toasts. Eyes too close together make your ghost look cross-eyed. Too far apart and it looks more like an alien than a ghost. I aim for about an inch between the eyes and put the mouth about half an inch below the center point between them.
Serving These Halloween Ghost Toasts
The best part about Halloween ghost toasts? They’re perfect for any Halloween meal. Breakfast, lunch, afternoon snack, or even dessert—these little guys work everywhere. I’ve served Halloween ghost toasts at school Halloween parties, family gatherings, and random Tuesday mornings when we needed something fun.
Kids absolutely lose their minds over Halloween ghost toasts. My friend’s 4-year-old refused to eat hers because she thought it was “too cute to bite.” On the other hand, my nephew devoured three of them and asked if I could make Halloween ghost toasts every day until Christmas. The answer was no, by the way.
For Halloween parties, I make a whole platter of Halloween ghost toasts with different expressions. Some happy, some surprised, some with tiny ghost tears made from white chocolate drizzle. It’s become my signature Halloween dish, which is both exciting and slightly embarrassing because they’re basically fancy toast.
Adults love these Halloween ghost toasts too, though they pretend it’s because they’re “helping the kids eat them.” Sure, Karen, that’s why you’ve had four Halloween ghost toasts and your kid has had one. We all see what’s happening here, and honestly, I support it because they’re ridiculously good.
Storage and Make-Ahead Tips
Here’s something nobody tells you about Halloween ghost toasts—they don’t keep well once assembled. The bread gets soggy, the cream cheese gets weird, and the whole thing becomes a sad, mushy mess. So don’t try to make Halloween ghost toasts hours ahead unless you want disappointment for breakfast.
But! You can prep components for Halloween ghost toasts the night before. Make your ghost mixture and store it covered in the fridge. Pre-cut your chocolate chips into smaller pieces if you’re feeling fancy. Have your bread sliced and ready. Then assembly only takes about 10 minutes in the morning for perfect Halloween ghost toasts.
If you somehow have leftover ghost mixture after making Halloween ghost toasts (which never happens in my house), it makes an excellent fruit dip. Apples, strawberries, grapes—everything tastes better with sweet cream cheese ghost mixture. Just don’t tell the kids it’s the same stuff from the Halloween ghost toasts or they’ll expect ghost faces on their apple slices too.
The ghost mixture actually freezes pretty well too. I’ve made double batches when I’m feeling ambitious and frozen half for later Halloween ghost toasts. Just thaw it in the fridge overnight and give it a quick stir before using.
Troubleshooting Your Halloween Ghost Toasts
Let me save you from some of the mistakes I made with Halloween ghost toasts. Because believe me, I made them all so you don’t have to.
If your cream cheese mixture is too runny for Halloween ghost toasts, stick it in the fridge for 20 minutes. If it’s still not thick enough, beat in a little more powdered sugar, one tablespoon at a time. Don’t add flour—I tried that once and it was gross.
When your chocolate chip faces keep sinking into the cream cheese on Halloween ghost toasts, it means your mixture is too warm or too thin. Chill everything for a bit and try again. Also, pressing the chips in very gently helps—you’re not trying to embed them permanently, just nestle them in.
For Halloween ghost toasts that look more like abstract art than ghosts, practice makes perfect. My first dozen looked like aliens had landed on toast. But even weird-looking Halloween ghost toasts taste amazing, so don’t stress too much about perfection.
Final Thoughts on Halloween Ghost Toasts
Look, Halloween ghost toasts aren’t going to win any culinary awards, but they’re going to win hearts and make October mornings infinitely more fun. They’re sweet enough to feel like a treat but simple enough that you can make them on a random Wednesday when you need something to smile about.
The best part about Halloween ghost toasts? Watching kids’ faces light up when they see them. My neighbor’s daughter literally gasped and clapped when I brought over a plate of Halloween ghost toasts last week. That reaction alone makes all the failed attempts worth it.
These Halloween ghost toasts have become part of our October tradition now. The kids expect them, the adults secretly love them, and I’ve gotten pretty good at making ghost faces that actually look like ghosts instead of confused blobs.
So give these Halloween ghost toasts a try, and don’t worry if your first batch looks a little wonky. Even imperfect ghosts are better than boring regular toast, and honestly, the imperfect ones usually have the most personality anyway.
Happy Halloween, and may all your Halloween ghost toasts actually look like ghosts! 🎃
Also check these Halloween Ghost Cupcakes That Won’t Haunt Your Kitchen (In a Bad Way)
Halloween Ghost Toasts
Adorable Halloween ghost toasts made with sweet cream cheese mixture on toasted brioche bread. Perfect spooky breakfast treat that kids and adults will love, using simple ingredients you probably already have.
Ingredients
- 6-8 slices brioche or thick white bread
- 8 oz cream cheese, softened
- 2 tablespoons powdered sugar
- 1 teaspoon vanilla extract
- Mini chocolate chips for faces
- Black sesame seeds (optional)
Instructions
-
Step 1Let cream cheese soften at room temperature for 2 hours until very soft and spreadable.
-
Step 2Beat softened cream cheese with electric mixer for 2-3 minutes until fluffy.
-
Step 3Add powdered sugar and vanilla extract to cream cheese, beat until smooth and thick enough to hold soft peaks.
-
Step 4Toast bread slices until golden brown but not too crispy.
-
Step 5Using offset spatula or butter knife, spread cream cheese mixture on toast in ghost shape - round head, flowing body that widens at bottom.
-
Step 6Add two mini chocolate chips for eyes, pressing gently pointy-side down into cream cheese.
-
Step 7Create mouth using single chocolate chip or toothpick dipped in melted chocolate for curved line.
-
Step 8Serve immediately while toast is still warm and cream cheese holds its shape.