
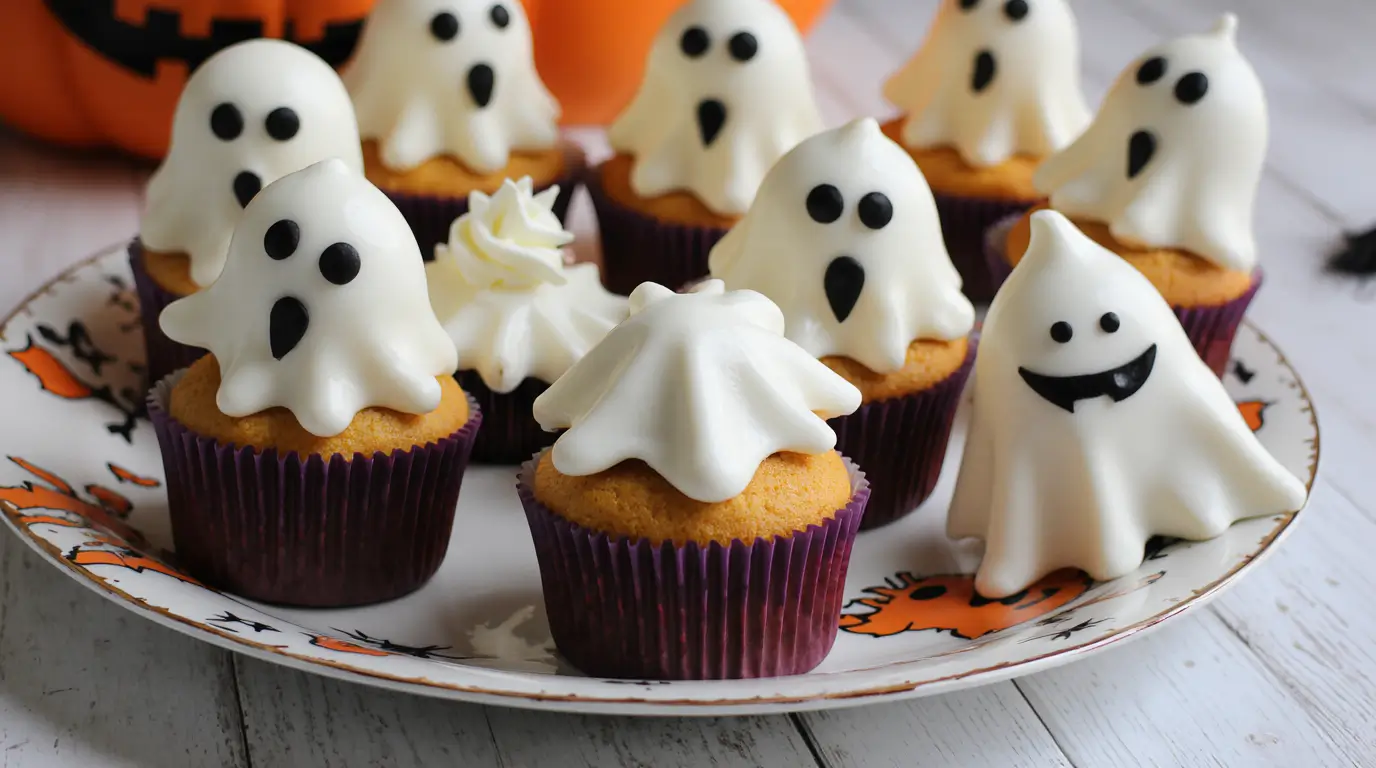
Halloween ghost cupcakes seemed like such a good idea until I tried making them for my daughter’s school party last year. Picture this: me at 11 PM, covered in powdered sugar, with 24 cupcakes that looked more like melted snowmen than ghosts. But here’s the thing about Halloween ghost cupcakes—once you figure out the tricks, they’re actually pretty foolproof.
I’ve spent the last year perfecting these Halloween ghost cupcakes, and now I’ve got a method that works even when you’re running on three hours of sleep and too much coffee. My 6-year-old can spot a “ghost” from across the room, which is apparently the ultimate test for successful Halloween ghost cupcakes.
Table of Contents
The Great Ghost Cupcake Disaster of 2024
Let me tell you about my first attempt at Halloween ghost cupcakes. I found this Pinterest recipe that looked adorable—perfectly fluffy white frosting ghosts with cute little chocolate chip eyes. Easy, right? Wrong.
The frosting was too runny (looked like ghost soup), the chocolate chips kept sinking, and by the time I got to school, half the “ghosts” had melted into abstract white blobs. The kids still ate them, but I definitely learned that successful Halloween ghost cupcakes require some actual technique.
That disaster taught me everything I know about making Halloween ghost cupcakes that actually look like ghosts instead of… well, whatever those things were.
What Makes These Halloween Ghost Cupcakes Actually Work
After multiple trials (and errors), I figured out that the secret to great Halloween ghost cupcakes is all about the frosting consistency and timing. These aren’t just regular cupcakes with white frosting slapped on top—there’s actually a method to the madness.
The base cupcakes can be whatever flavor you want. I usually do chocolate because, hello, it’s Halloween. But vanilla works too, especially if you’ve got picky eaters who think chocolate is “too much” for breakfast. Wait, did I say breakfast? I meant… snack time.
The Foolproof Halloween Ghost Cupcakes Recipe
For the Cupcakes (Basic but Good):
- 1 box chocolate cake mix (yeah, I use the box, fight me)
- Whatever the box says (usually eggs, oil, water)
- White paper cupcake liners (important for the ghost effect)
For the Ghost Frosting (This is Where the Magic Happens):
- 1 cup butter, room temperature
- 4 cups powdered sugar
- 1/4 cup heavy cream
- 1 tsp vanilla extract
- Pinch of salt
- Mini chocolate chips for eyes
- Black decorating gel (backup plan for eyes)
Look, I know some people make frosting from scratch all the time, but I only do it for these Halloween ghost cupcakes because store-bought doesn’t pipe right for the ghost shape. Trust me, I tried.
Making the Cupcakes (The Easy Part)
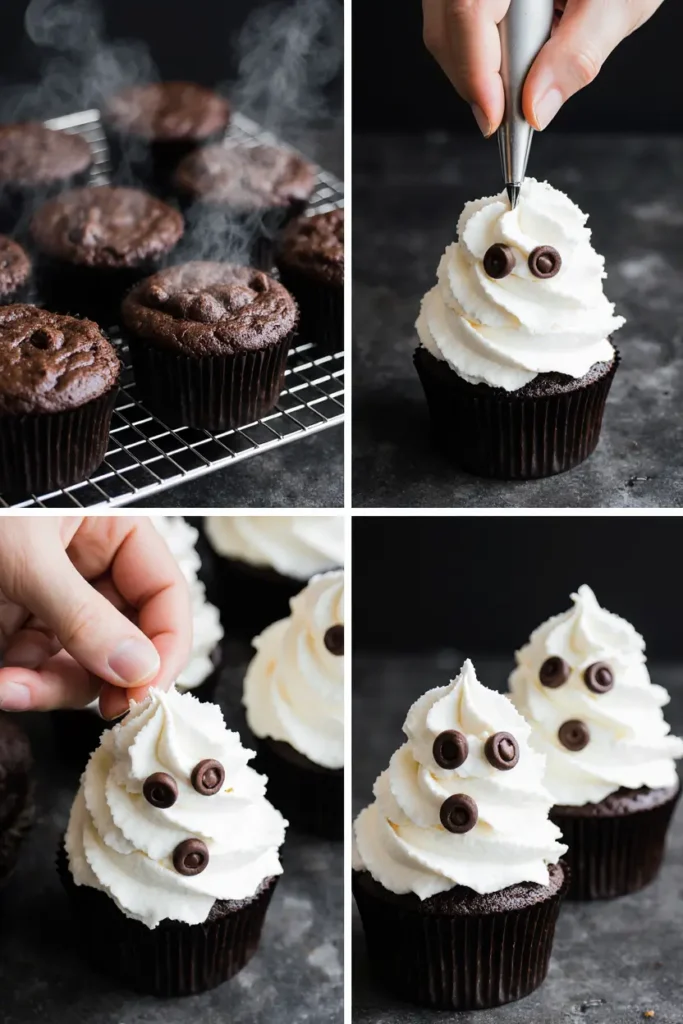
Mix up your cupcakes according to the box directions. I know, I know—from-scratch baking purists are cringing. But when you’re making Halloween ghost cupcakes for 25 kids, efficiency wins over perfection.
Bake them in white paper liners because colored liners show through the white frosting and ruin the ghost effect. I learned this the hard way with orange liners that made my Halloween ghost cupcakes look jaundiced.
Let them cool completely. And I mean completely. Warm cupcakes will melt your beautiful ghost frosting faster than you can say “boo.” While they’re cooling, make your frosting and maybe have a cup of coffee. You’ll need it.
The Ghost Frosting Game-Changer
This is where most Halloween ghost cupcakes go wrong—the frosting. You need it thick enough to hold a shape but smooth enough to pipe. Here’s my foolproof method:
Beat the butter until it’s fluffy (like, really fluffy, 3-4 minutes). Gradually add the powdered sugar, alternating with cream. Add vanilla and salt. Beat until it’s smooth and holds stiff peaks when you lift the beaters.
If it’s too thick, add cream one teaspoon at a time. Too thin? More powdered sugar. The consistency should be like… well, like really good buttercream that can hold a ghost shape.
Pro tip I learned from my neighbor who actually went to pastry school: let the frosting sit for 10 minutes before using it. Something about the ingredients settling. Sounds fancy, but it works for Halloween ghost cupcakes.
Creating the Perfect Ghost Shape
Here’s where these Halloween ghost cupcakes either look adorable or like abstract art. You need a piping bag with a round tip (I use Wilton 1A, but honestly, any large round tip works).
Start piping in the center of the cupcake and work your way out in a spiral, building up height. Then—and this is key—lift the piping bag up and slightly to one side to create that classic ghost “tail” shape.
The first few Halloween ghost cupcakes might look wonky. That’s normal. By cupcake number five, you’ll get the hang of it. By cupcake number twenty, you’ll be wondering why you volunteered to make treats for the entire class.
The Eye Situation (Trickier Than Expected)
Mini chocolate chips work great for eyes, but you have to place them while the frosting is still soft. If you wait too long, they’ll just roll off, and you’ll have eyeless ghost cupcakes, which is somehow more disturbing than regular ghosts.
I usually do two chocolate chips for classic ghost eyes, but sometimes I get creative. One eye for winking ghosts. Three eyes for alien ghosts. My kids think this is hilarious, which is really all that matters for Halloween ghost cupcakes.
If the chocolate chips aren’t cooperating, black decorating gel works too. Just dot it on with the tip. Less cute than chips, but definitely more reliable.
Storage Tips (Because You’ll Make These Ahead)
Halloween ghost cupcakes can be made a day ahead, which is great because Halloween is chaotic enough without last-minute baking. Store them in a single layer in a covered container. Don’t stack them—the ghosts will get smooshed and look sad.
The frosting actually firms up overnight, which makes the Halloween ghost cupcakes easier to transport. I learned this accidentally when I made them too early and panicked about them getting ruined. Turns out, day-old ghost frosting is more stable than fresh.
Variations That Actually Work
Vanilla Ghost Cupcakes: Use vanilla cake mix instead of chocolate. Same frosting technique for these Halloween ghost cupcakes.
Funfetti Ghost Cupcakes: Because apparently some kids want colorful sprinkles even in their ghost cupcakes. The sprinkles show through the white frosting slightly, which looks kind of cool actually.
Orange Base Ghost Cupcakes: Add orange food coloring to vanilla cupcakes for a subtle Halloween vibe. The contrast with white ghost frosting is pretty neat.
Mini Ghost Cupcakes: Use mini cupcake pans for bite-sized Halloween ghost cupcakes. Faster to eat, easier to transport, and kids love tiny food.
What I Learned Making Halloween Ghost Cupcakes
After making probably 200+ Halloween ghost cupcakes over the past few years (between school parties, neighborhood events, and my own kids’ demands), here’s what actually matters:
The frosting consistency is everything. Too soft and your ghosts melt. Too stiff and you can’t pipe smooth shapes. Practice makes perfect, but even imperfect Halloween ghost cupcakes are still pretty cute.
Kids don’t care about perfection. My wonky first attempts were still the hit of the party. Adults might notice if your ghosts look more like blobs, but kids just see “white cupcakes with chocolate chips” and they’re happy.
Make extra frosting. You’ll mess up a few ghosts and want to re-do them. Plus, there’s always one cupcake that needs a frosting touch-up after transport.
The Real Talk About Halloween Ghost Cupcakes

These aren’t going to win any professional baking contests, and that’s okay. They’re meant to be fun, slightly spooky treats that make kids giggle and adults remember why Halloween is actually pretty great.
I’ve made these Halloween ghost cupcakes for preschool parties where toddlers immediately ate the chocolate chip eyes first. I’ve made them for older kids who spent five minutes analyzing whether each ghost had the right “expression.” They work for all ages.
The best part about mastering Halloween ghost cupcakes is that you can make them every year and kids will still be excited. It’s like having a reliable Halloween tradition that doesn’t require elaborate costumes or hours of pumpkin carving.
Final Ghost Wisdom
Don’t stress too much about making perfect Halloween ghost cupcakes. Half the charm is in their slightly imperfect, homemade appearance. Store-bought cupcakes with perfect piping look fancy, but homemade ghost cupcakes with character are way more memorable.
And if all else fails, remember that Halloween ghost cupcakes covered in enough chocolate chips just become “chocolate chip cupcakes with a Halloween theme.” Nobody’s complaining about that.
Try these out, see how they work in your kitchen, and don’t be discouraged if your first batch looks more like abstract art than ghosts. Even wonky Halloween ghost cupcakes taste delicious, and that’s really what matters.
Happy Halloween baking! (And may your frosting consistency be ever in your favor.) 👻
check also The Best Halloween Vampire Bite Cupcakes
10 Easy Labor Day Recipes
A collection of 10 foolproof Labor Day recipes perfect for end-of-summer entertaining. These easy dishes require minimal effort but deliver maximum flavor for your Labor Day celebration.
Ingredients
- 2 racks baby back ribs
- BBQ sauce
- Dry rub seasoning
- 3 lbs small potatoes
- 6 hard-boiled eggs
- 1 cup mayonnaise
- Fresh corn on the cob
- Herb butter
- Mixed beans (green, wax, kidney)
- Coleslaw mix
- Apple cider vinegar
- Chicken pieces
- Italian dressing
- Watermelon
- Feta cheese
- Fresh mint
- 3-4 lb pork shoulder
- Cherry tomatoes
- Fresh mozzarella balls
- Fresh basil
- Vanilla pudding mix
- Vanilla wafers
- Bananas
Instructions
-
Step 1For ribs: Wrap seasoned ribs in foil and bake at 300°F for 2.5 hours, then unwrap and add sauce for final 30 minutes.
-
Step 2For potato salad: Boil potatoes until tender, cool completely, then mix with mayo, mustard, eggs, and seasonings.
-
Step 3For grilled corn: Grill corn and top with herb butter made from softened butter mixed with fresh herbs.
-
Step 4For bean salad: Combine drained beans with vinaigrette and let marinate overnight for best flavor.
-
Step 5For coleslaw: Toss coleslaw mix with apple cider vinegar dressing and let sit to develop flavors.
-
Step 6For chicken: Marinate in Italian dressing, then grill over medium heat to 165°F internal temperature.
-
Step 7For watermelon salad: Combine cubed watermelon with feta, mint, lime juice, and black pepper.
-
Step 8For pulled pork: Cook pork shoulder with BBQ sauce and seasonings in slow cooker for 8 hours, then shred.
-
Step 9For caprese skewers: Thread cherry tomatoes, basil leaves, and mozzarella balls on skewers, drizzle with balsamic glaze.
-
Step 10For banana pudding: Layer prepared pudding, sliced bananas, and vanilla wafers, chill overnight.